スコープの対象病変への誘導
Make sure that the UP indication on the insertion tube rotation ring is aligned with the UP indication on the control section.
After injecting 2% lidocaine jelly in the nasal cavity, intubate nasally a 4.5 or 5 mm cuff-less tracheal tube under the endo- scopic view. The advantages of using the tracheal tube include ease of insertion/withdrawal, a reduction in the stimulus to the nasal and pharyngeal mucosa and vocal cords caused by movement of the bronchoscope, stabilization of the “floppy” thin bronchoscope, reduction of deflection, and easier transmission of the torque required to advance the bronchoscope to its distal end. Apply local anesthesia to the bronchi using 2% lidocaine and conduct observation as far as the subsegmental bronchus level.
Raise the left hand high and keep the insertion tube straight when inserting the bronchoscope.
Approaching the lesion
It is important to perform the CT scan and plan the bronchial route for accessing the target region beforehand. While ob- serving the branching of the bronchi directly, advance the ultrathin bronchoscope through the bronchi, following the pre- planned route. When it is required to rotate the bronchoscope by large rotation, it is effective to use the insertion tube rota- tion function. If the peripheral bronchi collapse and obstruct the view, which can occur as a result of suction, the view can be usually be reacquired by ceasing to perform suction. If fluoroscopy can be used, confirm that the scope is advancing toward the target lesion.
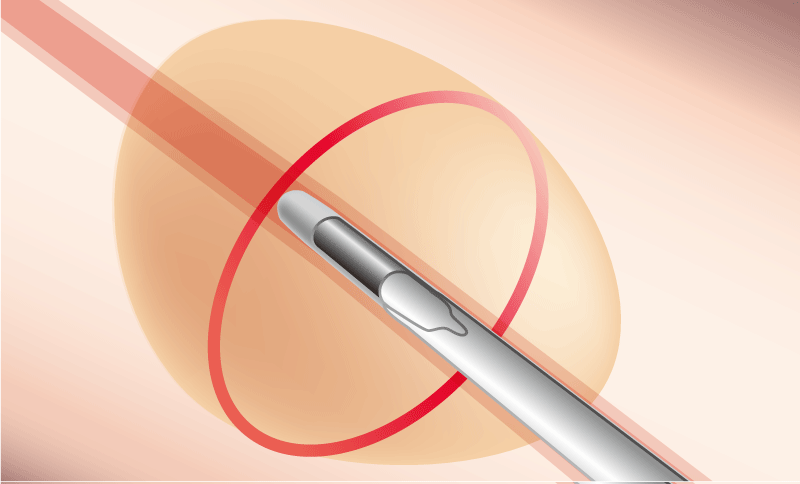
R-EBUS画像の描出
気管支鏡を可能な限り対象病変近傍へ誘導した後、
R-EBUSプローブを鉗子口から挿入し対象病変へ進める。
鉗子チャンネルはレンズの横に配置されているため、気管支分岐部においては、正面視している気管支ではなくその横の気管支にプローブが入っていく場合がある。
よって可能な限り、内視鏡画像上でR-EBUSプローブが目的の気管支に入っているかを確認する。
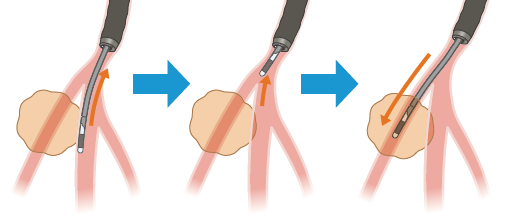
R-EBUSプローブを病変内(Within)に挿入できたら、R-EBUSプローブをガイドにして気管支鏡を更に末梢に進めてみる。
気管支鏡が最も病変に近づいた状態でR-EBUSプローブを出し入れし、対象病変の描出に再現性があるか(何度出し入れしてもWithinになるか)を確認する。
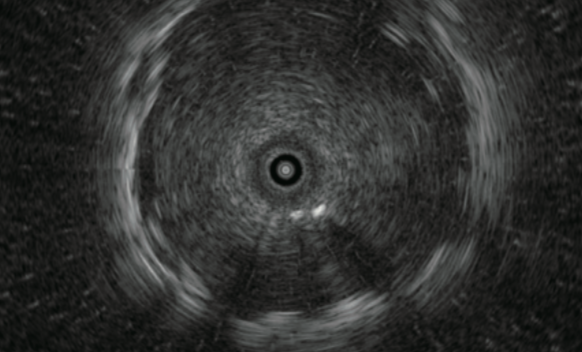
病変の中心部
病変の辺縁部

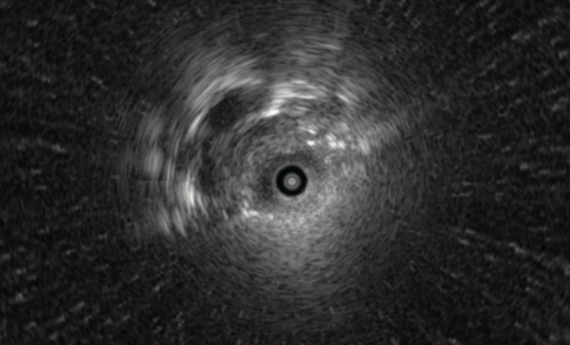
R-EBUS画像をWithinにするために気管支を選択する方法
方法1. X 線透視画像を確認しながら、気管支鏡、及びR-EBUSプローブの方向を修正する。
方法2. 超音波画像を確認しながら気管支鏡のアングルをかけ、R-EBUSプローブに病変が近づく方向に位置する気管支を選択し直す。
方法3. 内視鏡画像を確認しながら、直接的に気管支を選択し直す。
The probe could be damaged if it is subjected to an excessive force or if strong angulation is applied while the probe is being advanced into a bronchial branch.
Sampling
The instrument channel of the BF-MP190F has a diameter of 1.7 mm, which is smaller than that of a standard 2.0mm instru- ment channel. Therefore, biopsy forceps with a diameter of 1.5 mm and a cytology brush with a diameter of 1.4 mm can be used.
Biopsy
The lesion in a peripheral bronchus might be sometimes visible within the endoscopic field of view. However, since the peripheral bronchi are thin, collapse easily and have poor visi- bility, there is no need to perform a biopsy under direct view if it is not allowed. After con- firming the probe is positioned “within” the lesion in the EBUS image, wedge the broncho- scope in the bronchus and continue biopsies.
Since specimens collected with ultrathin forceps are smaller than specimens collected with ordinary forceps, several sam- ples will be required. We usually collect 10 specimens and put each specimen in its own individual formalin-filled bottle to prevent loss. After collecting half the target number of biopsy samples (i.e., 5 specimens), reconfirm the lesion position with the probe. When withdrawing the thin forceps from the bronchoscope, pull slowly so as not to alter the orientation of the distal end of the scope.
If the thin forceps do not open properly, try opening the forceps by moving them back and forth.
After opening the thin forceps, apply the cup to the lesion and perform the biopsy.
If the lesion is located immediately below the pleura, take extra care to avoid pneumothorax.
The thin forceps has a small cup but still presents a risk of bleeding. If the endoscopic image reddens and the view dete- riorates while the target lesion is visible in a larger size in fluoroscopy, there may be bleeding. In this case, wait for about 3 minutes while keeping the bronchoscope in the wedged condition until the bleeding stops, and then withdraw the scope slowly.
Brush cytology
■ Insertion into the bronchoscope
Pull the ring to retract the brush into the tube, and advance the brush until the distal end of the insertion portion appears within the endoscopic field of view.
■ Collect tissue
Push the ring slowly to extend the brush from the tube and contact the target area.
Brush the target area to collect a tissue specimen.
Pull the ring to retract the brush into the tube before taking the brush away from the target area.
Bronchial washing
If the ultrathin bronchoscope has reached inside the lesion, withdraw the bronchoscope from the lesion to reduce the risk of intratumoral infection due to washing and then wash the lesion with a small amount (about 5 ml) of saline.
2 hours after completion, check that there is no pneumothorax with fluoroscopy.
In the peripheral bronchus, the washing solution could not be obtained sufficiently because of the collapse of the bronchi due to the deflation. While suctioning, slowly withdraw the bronchoscope from bronchi and try to collect the washing fluid. Then the bronchoscope can be removed through the tracheal tube and the washing fluid remaining in the operation channel can be collected in the collection container by suctioning the sterilized physiological saline.
Processing samples
Histological examination
Put each specimen in a numbered formalin-filled bottle to prevent loss and send it to the pathology department.
Cytological examination
■ Strike each brushed specimen on a slide glass to remove the cell component, rub slide glasses to stretch the specimen, immerse it an alcohol-filled bottle and send it to the pathology department.
■ If the presence of acid fast bacterium is suspected, send dried specimens for smear examination.
■ Wash the residual components attached to the brush in saline in a centrifuge tube and submit them for cultivation and
cytodiagnosis.
■ Submit the bronchoalveolar lavage fluid for culture and cytodiagnosis (or cell block examination).
- Content Type