Colorectal ESD using
the DualKnife™ device
Project associate professor, Next-Generation
Endoscopic Computer Vision/Gastroenterology,
University of Tokyo Hospital
Disclaimer: The positions and statements made herein by Prof. Tsuji are based on Dr. Tsuji’s experiences, thoughts and opinions. As with any product, results may vary, and the techniques, instruments, and settings can vary from facility to facility. The content hereof should not be considered as a substitute for carefully reading all applicable labeling, including the Instructions for Use. Please thoroughly review the relevant user manual(s) for instructions, risks, warnings, and cautions. Techniques, instruments, and setting can vary from facility to facility. It is the clinician’s decision and responsibility in each clinical situation to decide which products, modes, medications, applications, and settings to use.
Biography
- 2004 Mar. Graduated from Faculty of Medicine, The University of Tokyo Apr. Resident at JR Tokyo General Hospital
- 2006 Apr. Dept. of Gastroenterology, JR Tokyo General Hospital
- 2007 Apr. Dept. of Gastroenterology, The University of Tokyo Hospital
- 2008 Apr. Dept. of Gastroenterology, NTT Medical Center Tokyo
- 2013 Aor. Dept. of Gastroenterology, The University of Tokyo Hospital
- 2014 Mar. Master’s degree at Graduate School of Medicine, University of Tokyo
- 2014 Apr. Dept. of Endoscopy and Endoscopic Surgery, University of Tokyo Hospital
- 2015 Feb. Assistant Prof. at Dept. of Gastroenterology, University of Tokyo Hospital
- 2016 Jan. Part-time teacher at Dept. of Internal Medicine III (Gastroenterology), Kyorin University
- 2022 Apr. Project Lecturer, Dept. of Gastroenterology, University of Tokyo Hospital
- 2023 Jan. Project Associate Professor, Next-Generation Endoscopic Computer Vision/Gastroenterology, University of Tokyo Hospital
Introduction to the Hospital The University of Tokyo Hospital
Location: Hongo 7-3-1, Bunkyo-ku, Tokyo, Japan / Number of beds: 1,157 (as of FY2024)
The Department of Gastroenterology of the hospital is composed of three groups: GI tract diseases, liver diseases and biliary & pancreatic diseases. All three groups are actively involved in both clinical and research domains. The department also makes active efforts in endoscopic treatment in close collaboration with other departments – mainly surgical – that deal with high-difficulty, high-risk cases, most of which are referred from other hospitals. At present, the department performs ESD in about 100 esophageal cases, about 160 gastric cases, and about 200 colorectal cases every year. In recent years, it has also focused on endoscopic full-thickness resection (EFTR) of gastric submucosal tumors, endoscopic duodenal treatment, and hypopharyngeal ESD jointly performed with the ENT Dept.
Endoscopic submucosal dissection (ESD) was initially developed for gastric lesions in the late 1990s and was subsequently adapted for colorectal lesions. More than a quarter of a century has passed since the technique was first developed. Over this time, exciting new devices have been developed and methodologies have also evolved. Ideally, each physician should use the procedures and devices that suit them best. Needle-type knives are used universally in current colorectal ESD in Japan. This article discusses strategies for colorectal ESD in actual cases using needle-type knives.
Knives for use in colorectal ESD
Before presenting cases, I will discuss the incision device I use. As for “Which knife is best?”, the optimal answer is to select the one that best aligns with your preferences, based on an understanding of the characteristics of each knife. Because the muscularis propria is thin, colorectal ESD requires precise incision and dissection. Needle-type knives are very useful from this standpoint.
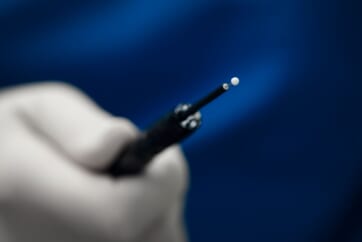
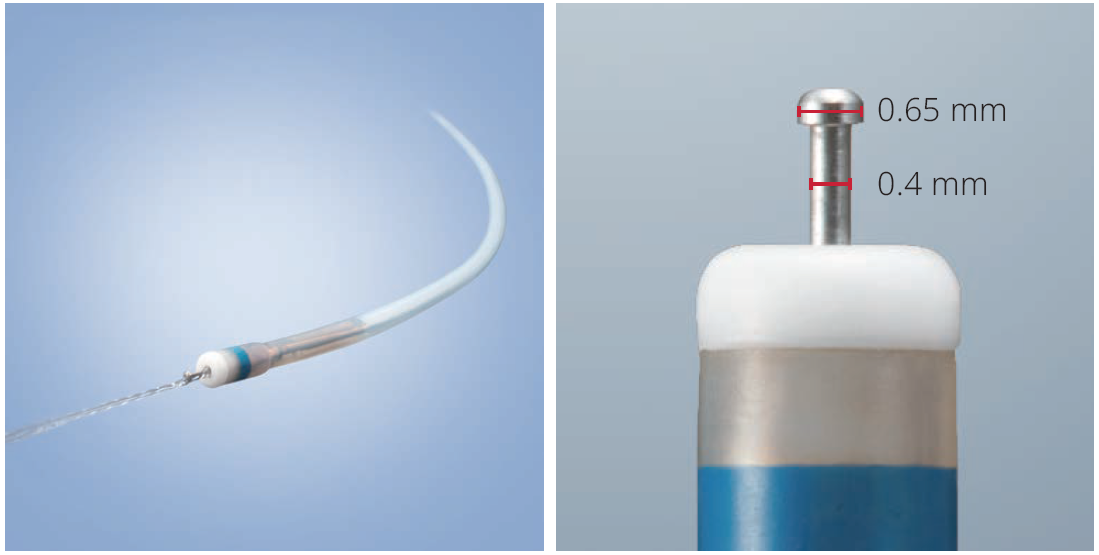
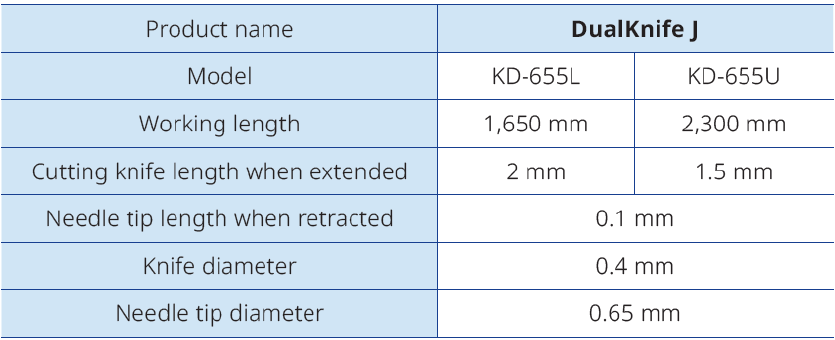
A needle-type knife such as the DualKnife™ J is one option. Its knob-shaped tip (0.65 mm) and moderate shaft diameter (0.4 mm) may allowto hook incised tissue and access to narrow spaces. It also includes a jet function for submucosal injection.
[Case 1] Rectal Ra LST-NG-PD 15 mm
Let’s begin with a relatively basic case (Fig. 2a).
The initial local injection determines the outcome.
Video 1 : Points in local injection
Introduction into the submucosal layer is widely regarded as difficult in colorectal ESD. In this regard, the initial local injection is crucial. If the local injection reliably elevates the lesion and causes the proximal part of the lesion to swell like a bun, then the first incision can open up the optimal layer immediately. When performing the initial local injection, focus on creating the “shape” of that injection yourself.
Fig. 2 shows the initial phases of case 1, illustrating how a properly executed local injection allows wide spreading with a single incision and facilitates subsequent introduction into the submucosal layer.
Fig. 1 Ideal local injection
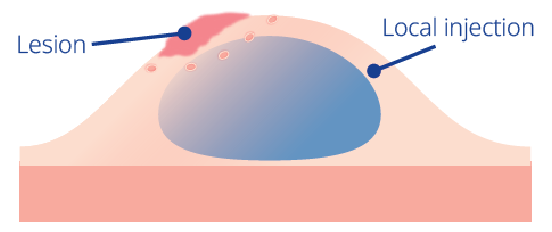

Fig. 2
.png)
.png)
.png)
.png)
Proper introduction into the submucosal layer determines the outcome !
Video 2 : Tips for introduction into the submucosal layer and dissection
The importance of proper local injection is as described above, but proper “introduction into the submucosal layer”, i.e., entry of the scope tip beneath the mucosal flap, also leads to a favorable result, after which you simply proceed with dissection (Fig. 3). Merely incising the mucosa does not allow introduction into the submucosal layer. Introduction into the submucosal layer may be possible after removing submucosal tissue a few times in the optimal manner, but this means that you must hold the proximal mucosa so that a large portion of the submucosal layer which you are going to cut is exposed, as shown in Fig. 4. In this figure, the mucosa is carefully held with the DualKnife™ J’s knob-shaped tip. A similar effect can be obtained by properly using the 6 o’clock position of the distal hood. Even so, it is still not easy to penetrate the layer with a single sweep.
Among the techniques that would facilitate introduction into the submucosal layer, one that can be used with the DualKnife™ J device is to “lift up with the tip”, as shown in Fig. 5. Lift the lesion flap with the sheath of theDualKnife™ J device and, after visually recognizing the submucosal layer you are going to cut, adjust the position as if aligning the knob-shaped tip with that line. The key here is to achieve maximum inflation (introduction into the submucosal layer is impossible if the lumen is completely filled with insufflated air) and to gently lift the layer with the tip of the hood (Fig. 6).

.png)
.png)
.png)
Do not immediately proceed to circumferential incision
The first thing to do after introducing the DualKnife™ J device into the submucosal layer is to dissect the blue submucosal layer in front of you toward the most distal position possible. Rather than immediately proceeding to circumferential incision, Advance in the center immediately beneath the lesion. This is known as the pocket-creation method (PCM)¹. After widening the pocket to a certain extent, perform dissection with the goal of opening the pocket to both the left and right (Fig. 7).
What is important here is to advance dissection by making use of the DualKnife™ J device’s precision. Your goal should be to remove fibers one by one along the optimal dissection line.
Fig. 7
.png)
.png)
.png)
.jpg)
[Case 2] Descending colon IIc 25 mm
When fibrosis is present, introduction into the submucosal layer becomes even more difficult. This case has a higher degree of difficulty than Case 1. It is a IIc lesion near an anastomotic site of the descending colon after surgery, accompanied by severe cramping and depression (Fig. 8).
For quick introduction into the submucosal layer – Water-pressure method (WPM)
Video 3 : Water-pressure method
.png)
Fig. 8
In this case, introduction into the submucosal layer appears more difficult than usual because the mucosa is thickened due to inflammation. We therefore applied the WPM². This technique was originally proposed for duodenal ESD but can be a powerful tool when introduction into the submucosal layer is difficult. As shown in Fig. 9, it effectively visualizes the tissue to be cut by properly using the tapered hood*. Because immersion expands the visual field, the knob-shaped tip of the DualKnife™ J device can be applied to the point to be cut.
Once the DualKnife™ J device has been introduced into the submucosal layer, you can use the PCM to excavate the central part and expose the fibrotic region (Fig. 9). After that, you can spread the pocket in the usual way and complete en-bloc resection.
*Procedural Disclaimer: References to the use of the tapered hood device during clinical procedures are provided for general educational context only. Olympus makes no representations regarding the safety or efficacy of this device. Healthcare providers must refer exclusively to the official Instructions for Use (IFU) for the proper handling, deployment, and procedural steps associated with this device.
Fig. 9
.png)
.png)
.png)
.png)
.png)
.png)
Using the DualKnife J device’s jet function
Video 4 : Tips for mucosa lifting
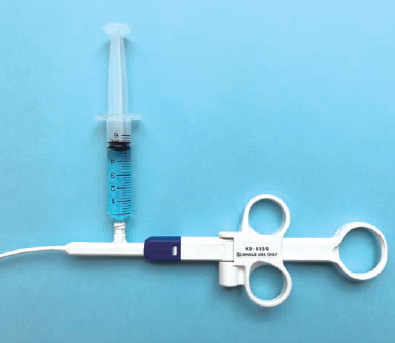
In cases with fibrosis, the knife’s jet function is particularly useful. Fig. 10 shows a mid-procedure phase in which the fibrotic region has been exposed. Because secure preservation of the dissection space is desirable at this stage, the usual approach is to switch devices and insert a local injection needle. However, changing devices takes time, and it is not uncommon for the field of view to change during that interval. Instead, using the DualKnife™ J device’s jet function allows you to proceed with dissection while delivering fluid.
When local injection is performed with a needle, the submucosal cushion may dissipate when the device is switched to the knife. The jet function, on the other hand, makes it possible to start dissection at the exact moment the submucosal layer is elevated.
The procedure to use the jet function is simple: 1) Retract the tip; 2) Lightly touch the target area with the sheath tip to deliver the liquid; 3) Project the knife tip; 4) Start the jet function through the knife.
This enables effective elevation of the submucosal layer. Connecting a water-jet pump to the knife is possible. If delivering saline, you can attach a 5–10 cc syringe externally to the knife and push by hand (Fig. 11).
In this case, it would also be acceptable to use a traction device at the initial stage. We will show an example using traction in another case: an LST that appears to enter the ileocecal valve. Although the terminal ileum side of the lesion is difficult to see, applying traction after incision makes it easier to identify the resection line. Applying a second traction device in a different direction can further facilitate resection.
Fig. 10
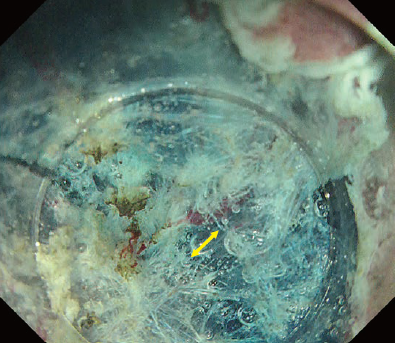

Fig. 11
Reference materials: 1) Miura Y, et al. Gastrointest Endosc. 2016;83(2) :457-8. 2) Yahagi N, et al. Endoscopy. 2017;49(10):E227-E228.
Any content or information (“Content”) presented herein is illustrative in nature and does not guarantee or represent specific information, outcomes, or results. Olympus Medical Systems Corp. and its parents, subsidiaries, affiliates, directors, officers, employees, agents, and representatives (collectively “Olympus”) does not represent to or warrant the accuracy or applicability of the Content. Under no circumstances shall Olympus be liable for any costs, expenses, losses, claims, liabilities, or other damages (whether direct, indirect, special, incidental, consequential, or otherwise) that may arise from, or be incurred in connection with, the Content or any use thereof.
- Content Type