Anesthesia
■ Preprocedural administration
Depending on the case, intramuscular injection of 0.5-mg atropine sulfate and 15-mg pentazocine should be performed. Local anesthesia should be accomplished by injecting lidocaine (1%) with epinephrine in the subcutaneous layer, muscle layer, and parietal pleural layer in the site where the trocar will be inserted.
■ Intraprocedural management
In most cases subject to thoracoscopy under local anesthesia, pleural effusion is pooled and one lung has already been collapsed to some extent. Even when the thoracic cavity is released to the atmospheric pressure for this reason, the decrease in the partial pressure of arterial oxygen (PaO2) is minor. Administer oxygen via nasal cannula at 2–3 L/min as required and monitor the oxygen saturation with a pulse oximeter. Also establish an intravenous line as a route to administer therapeutic medications in case an abnormality occurs in the circulatory system.
Basic technique
The technique of thoracoscopy under local anesthesia is basically the same as that used to insert a chest drainage tube so it can be performed by an internist as long as the indication is restricted and they are well trained in the technique. It is important to bear in mind that there is a time restriction when executing the procedure under local anesthesia. Also, as there is always a possibility of arterial bleeding and other potential issues, it is a good idea to establish a cooperative setup with surgeons and keep in constant contact with them during the procedure.
■ Preprocedural examination
Depending on the patient, pleural effusion may be present locally due to adhesion and other complications. Use an ultrasound to confirm the following: the thickness of the chest wall where the trocar puncture will be made; whether or not there is pleural adhesion; the location of pleural effusion; the degree of fibrin deposition in pleural effusion and its composition and the positional relationships with adjacent structures such as large vessels, the heart, and the diaphragm and how their positions are changed by breathing. Whether or not there is an adhesion can be confirmed by checking how the visceral and parietal pleural echoes move in sync with breathing.
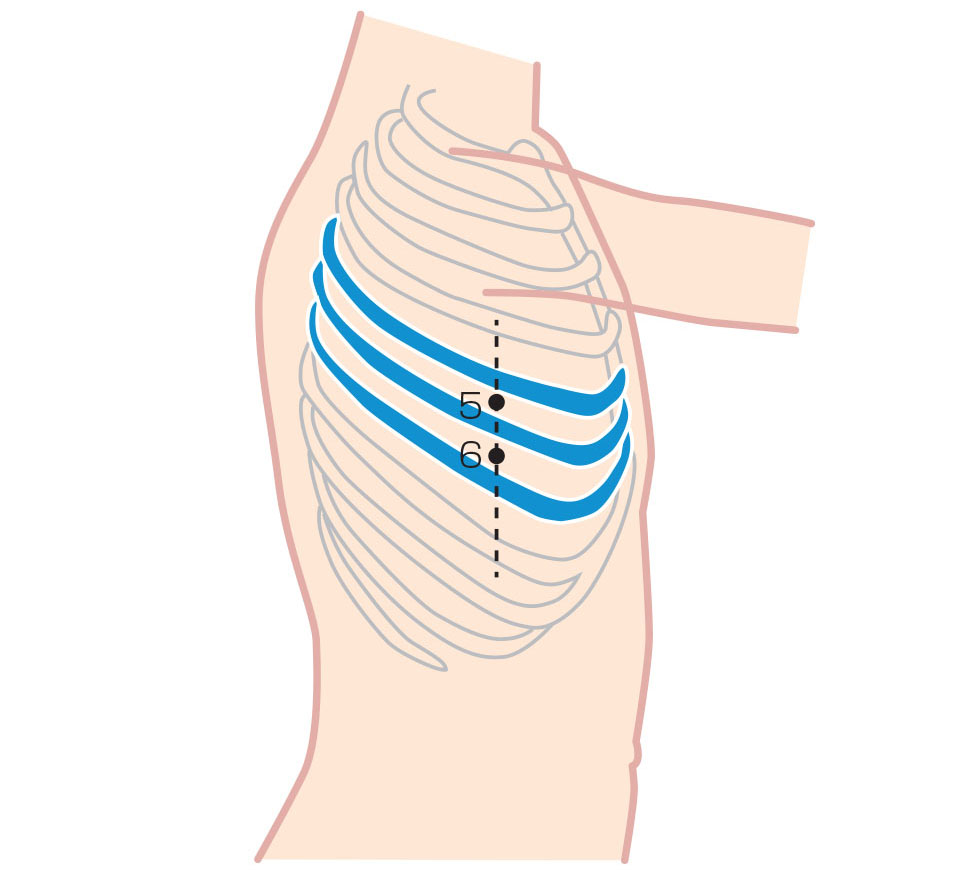
The trocar is usually placed in the 5th or 6th intercostal space in the midaxillary line. Change the placement position appropriately if puncture is difficult due to adhesion or other problems.
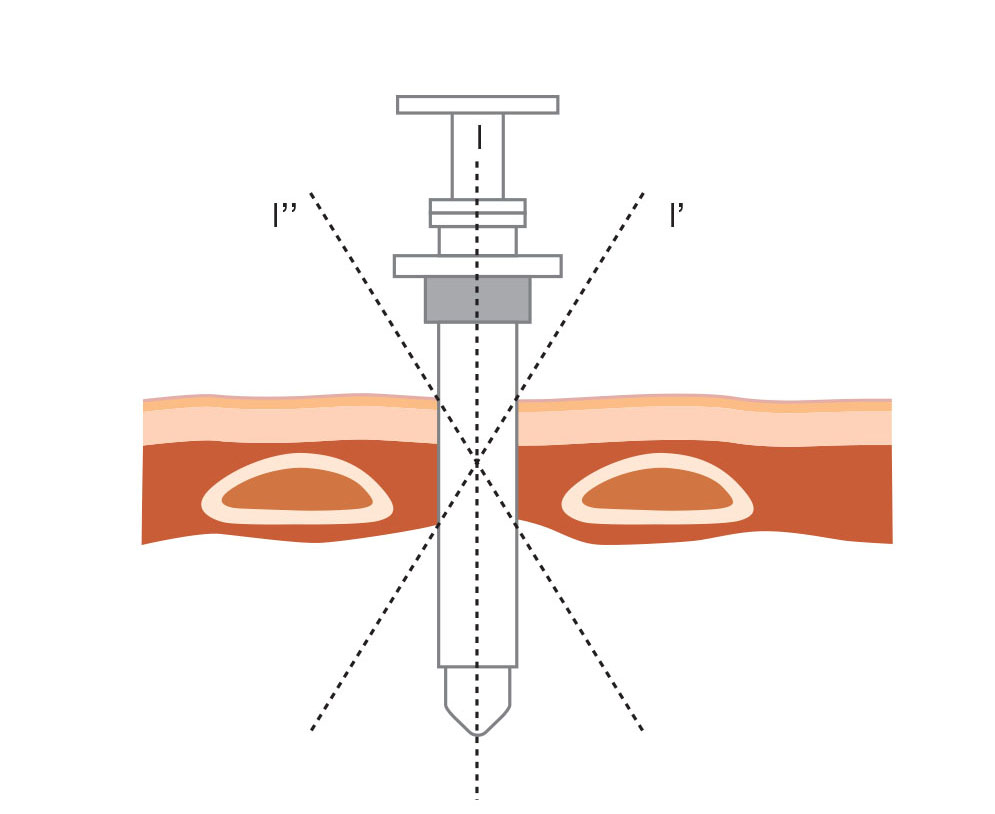
When the trocar insertion path is made in an oblique direction (I', I") with respect to the chest wall, orientation of the thoracoscope will be restricted. Make it as perpendicular as possible to facilitate observation of a wider area.
■ Trocar placement
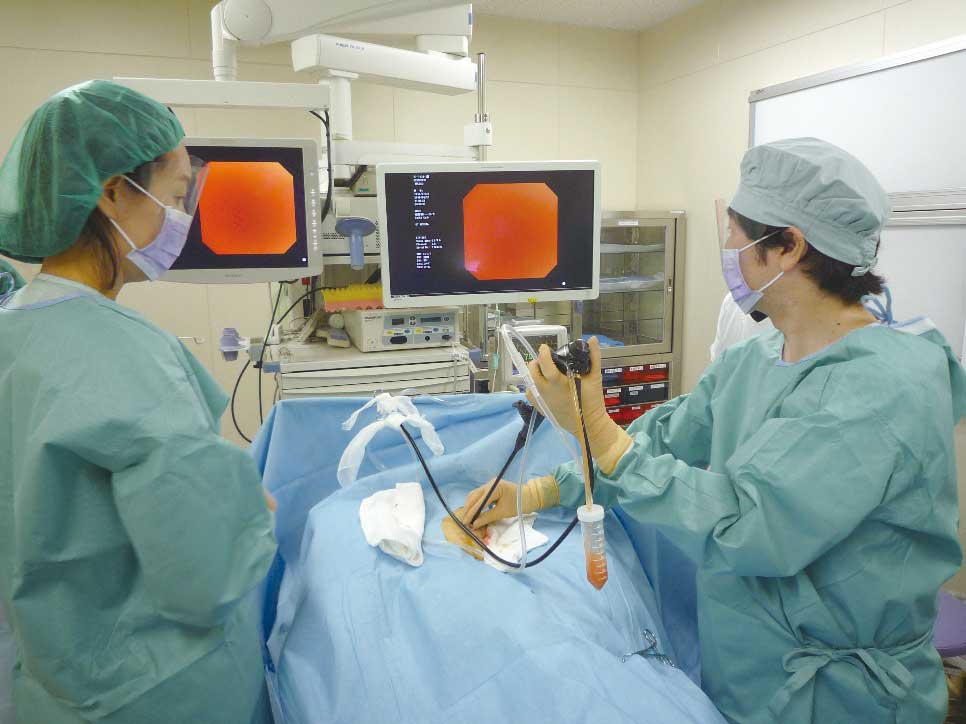
To minimize invasiveness, a single puncture hole is usually made when placing the trocar. Therefore, the puncture should be made at a point where as wide a region as possible of the interior of the thoracic cavity can be observed. The puncture position is determined according to CT findings and preprocedural ultrasound findings. Placing the trocar in the 5th or 6th intercostal space in the midaxillary line provides the widest possible view of the interior of the thoracic cavity (Fig. 2). Forcible manipulation of the thoracoscope between the ribs causes discomfort to the patient under local anesthesia, which restricts the movement of the thoracoscope. So it is important to place the trocar in a position where the intercostal space is as wide as possible. In thoracoscopy under local anesthesia, a flexible trocar is used (Photo 3).
After the skin has been disinfected with povidone-iodine solution, local anesthesia is performed. An incision of 1 to 1.5 cm is made and blunt dissection of the muscle layer is performed until the parietal pleura is incised to reach inside the thoracic cavity. Dissection should be made in a perpendicular direction with respect to the chest wall (Fig. 3).
You will know when you have made an incision in the parietal pleura because you will hear the sound of air rushing in. This releases the thoracic cavity to the atmospheric pressure, causing the lung to collapse to some extent. Now open the forceps to make an insertion path for the trocar and insert the trocar.
In patients with significant pooling of pleural effusion, the fluid may overflow as the pleura is incised so hold some gauze against the trocar entry site. If you feel resistance when inserting the trocar, do not insert it forcibly. Instead, widen the incision width.
In cases where there is no pleural effusion, create an artificial pneumothorax and wait until the lung has collapsed before inserting the trocar. Attach a 3-way stopcock to the artificial pneumothorax needle and connect a U-shaped tube or extension tube filled with sterile saline. Pay attention to the liquid level inside the tube because the level is moved by negative pressure at the very moment when the needle enters the thoracic cavity. Now release the 3-way stopcock to the atmospheric pressure to create a pneumothorax.
■ Pleural fluid drainage
Insert the thoracoscope through the trocar and suction pleural effusion via the air/water channel of the scope. If there is a large amount of pleural fluid, it will start to overflow as soon as the obturator is removed from the tube. Perform suction immediately. Use a tracheal suction kit to obtain a sample of pleural fluid if you are going to send it for cytological examination. Observation in regions near the mediastinum is easier when pleural fluid has been removed.
■ Observing the interior of the thoracic cavity
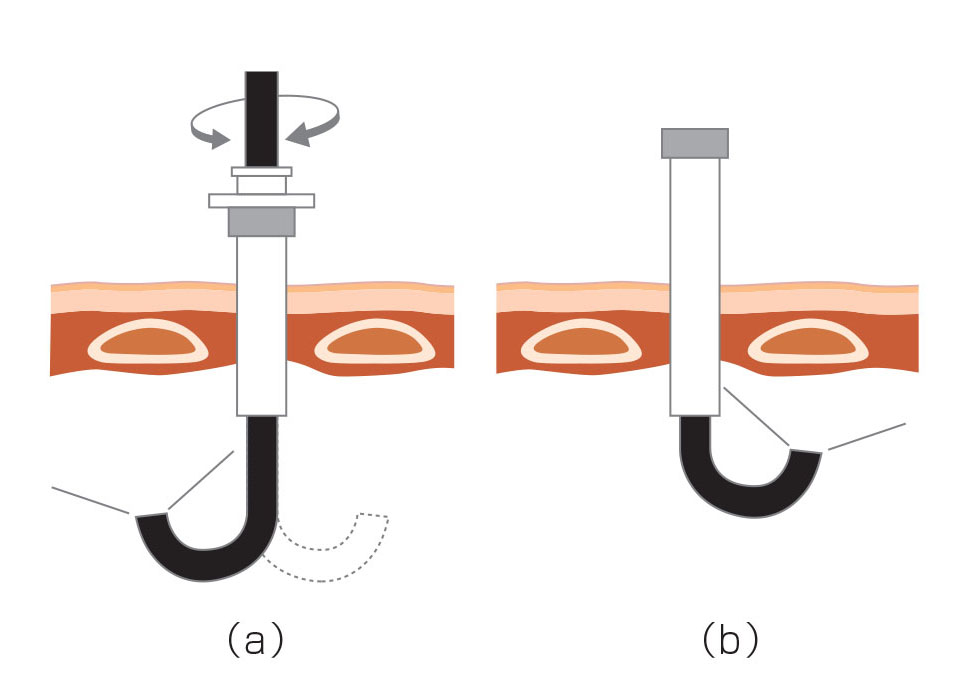
Sufficient collapse of the lungs cannot be accomplished under local anesthesia, making observation on the mediastinal side and in the apex difficult. If the thoracoscope is positioned at a sharp angle with respect to the chest wall, the ribs will be stimulated and the patient will start complaining about pain so avoid forcible manipulation of the scope as much as possible. While keeping the thoracoscope inserted as perpendicularly as possible, bend the distal-end flexible section to obtain a good field of view (Fig. 4 (a)).
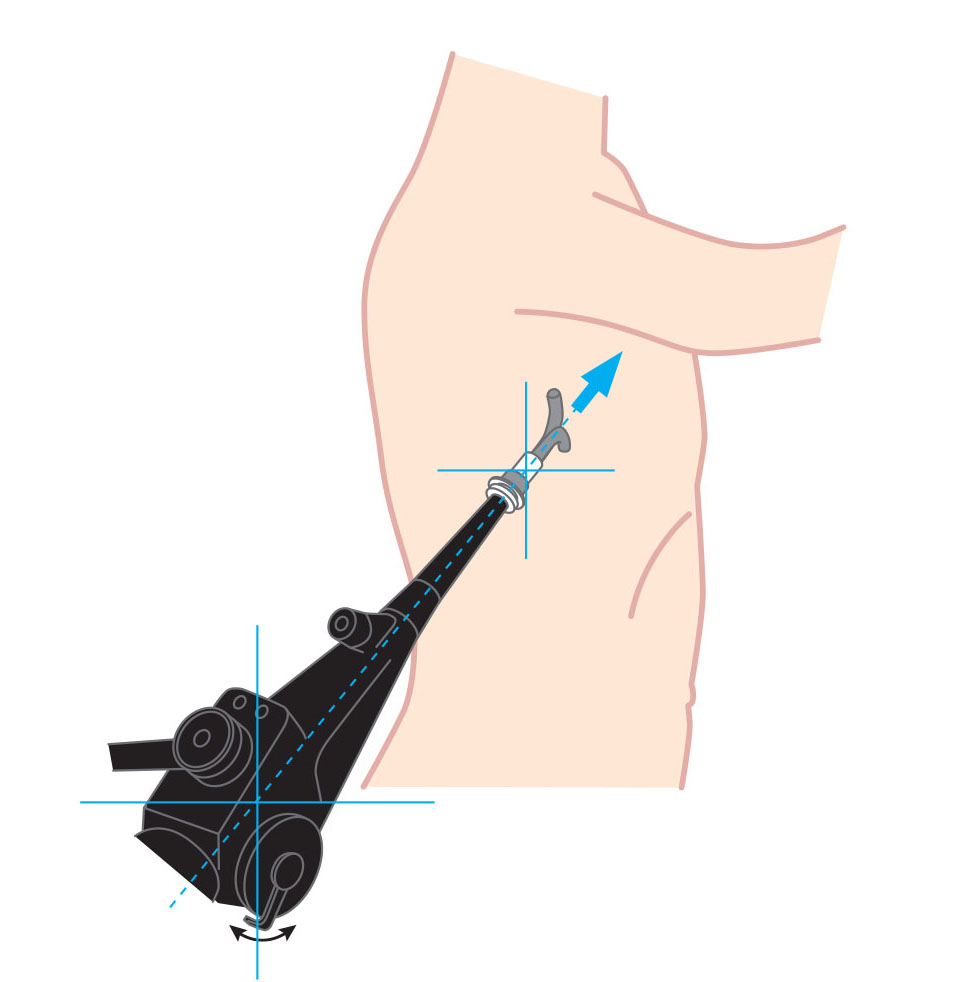
Whenever the thoracoscope lens fogs up, first suction the pleural fluid through the channel to attempt to clear the field of view. If there is no pleural fluid, prepare a warm saline solution and observe while dipping the thoracoscope tip in it as required. In case orientation of the insertion direction is lost, check the control section of the thoracoscope to confirm the angulation direction and make sure that you know which direction the scope tip is bent (Fig. 5). Also keep in mind that, when using a semi-flexible thoracoscope, the distance to the observation site may increase as the scope is pushed into the thoracic cavity with the scope tip sharply bent.
Perform observation systematically and in all directions – towards the apex, anterior chest wall, dorsal side, and diaphragm. Don’t omit anything and be sure to document the procedure with both still images and video. To observe the area around the insertion port, pull the flexible trocar to the point where it is just about to come out of the chest wall and bend the scope tip to obtain a good field of view (Fig. 4 (b)).
■ Biopsy
Generally, a biopsy should be performed from the parietal pleura and diaphragm. It should not be performed from the visceral pleura. Patients with normal pleura will feel pain during a biopsy, though they frequently will feel no pain in lesions such as carcinomatous pleuritis and malignant mesothelioma. When pain is likely to occur, spray xylocaine over the biopsy site with a spray tube in advance.
When performing a biopsy, adjust the angulation of the thoracoscope so that the forceps can contact the lesion in a perpendicular direction. When a lesion is sited on the thickened and hardened pleura, obtaining a sufficient biopsy sample may be impossible because the lesion is likely to make the cups of the forceps slippery. If this occurs, try pressing both the forceps and the scope tip against the pleura, while trying not to project the forceps from the scope tip any more than necessary. This allows appropriate force to be applied to the forceps and may help solve the problem.
While there are reports that semi-flexible thoracoscopic cryobiopsy and biopsy using an electrosurgical knife may improve biopsy efficiency, these are not indicated in Japan.
After biopsy, observe the thoracic cavity from edge to edge again to confirm whether there is any bleeding. Then proceed to indwelling the trocar catheter for pleural effusion drainage.
Postprocedural management
■ Indwelling trocar catheter for pleural effusion drainage
First observe the thoracic cavity to decide where the distal side of the trocar catheter will be indwelled. Draw a mental picture of the direction of the catheter and the degree of insertion according to the insertion depth of the scope and other factors. Now remove the flexible trocar and keep the trocar catheter indwelled.
The water shield drainage system should not be opened immediately, in cases where there is a large amount of pleural effusion and the lung has collapsed. Instead, repeat clamping and releasing to re-expand the lung a little at a time. If the lung is Re-expansion pulmonary edema, RPE may result.
- Content Type