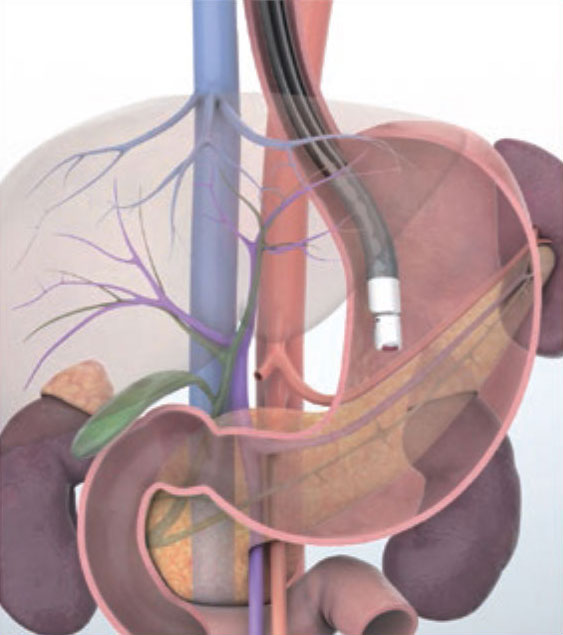
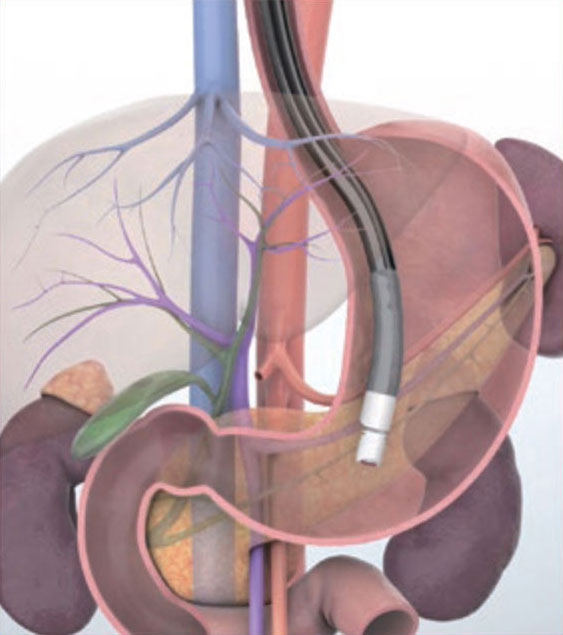
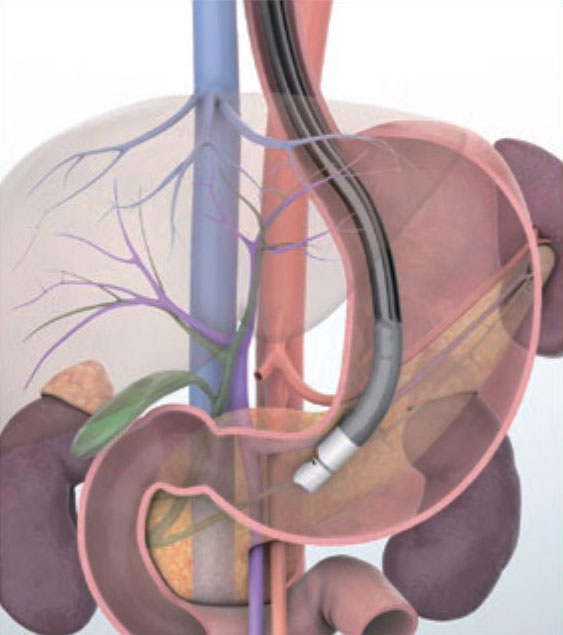
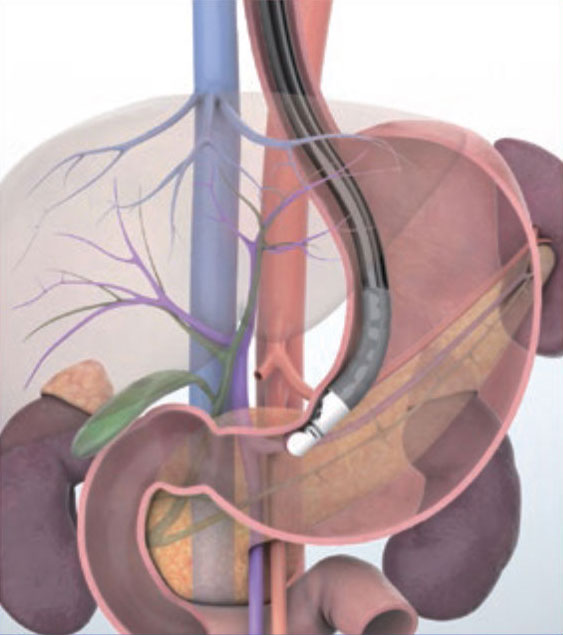
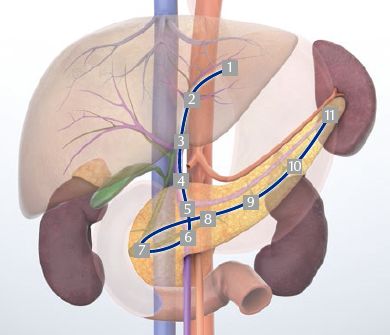
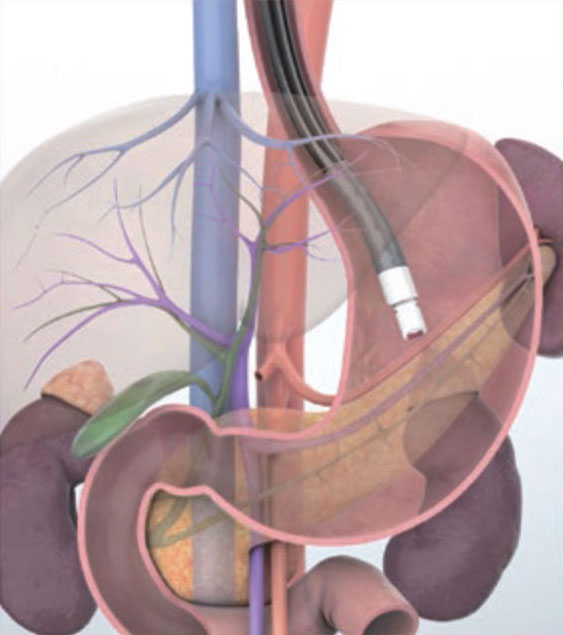
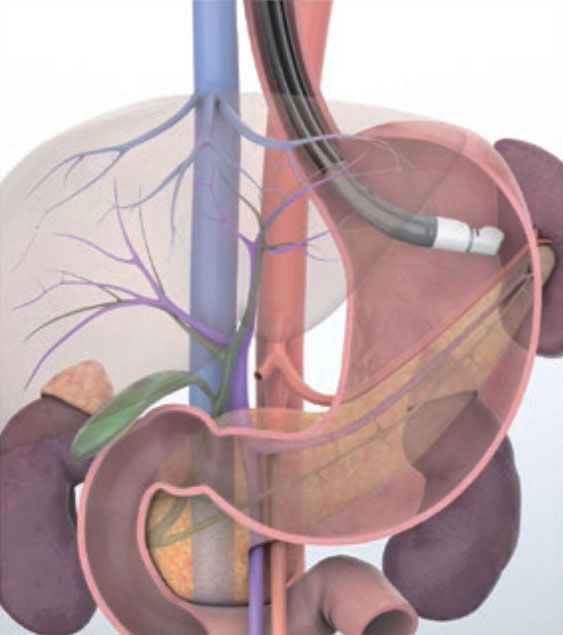
Imaging Techniques Transgastric approach (Aortic route)
IMAGING STEPS

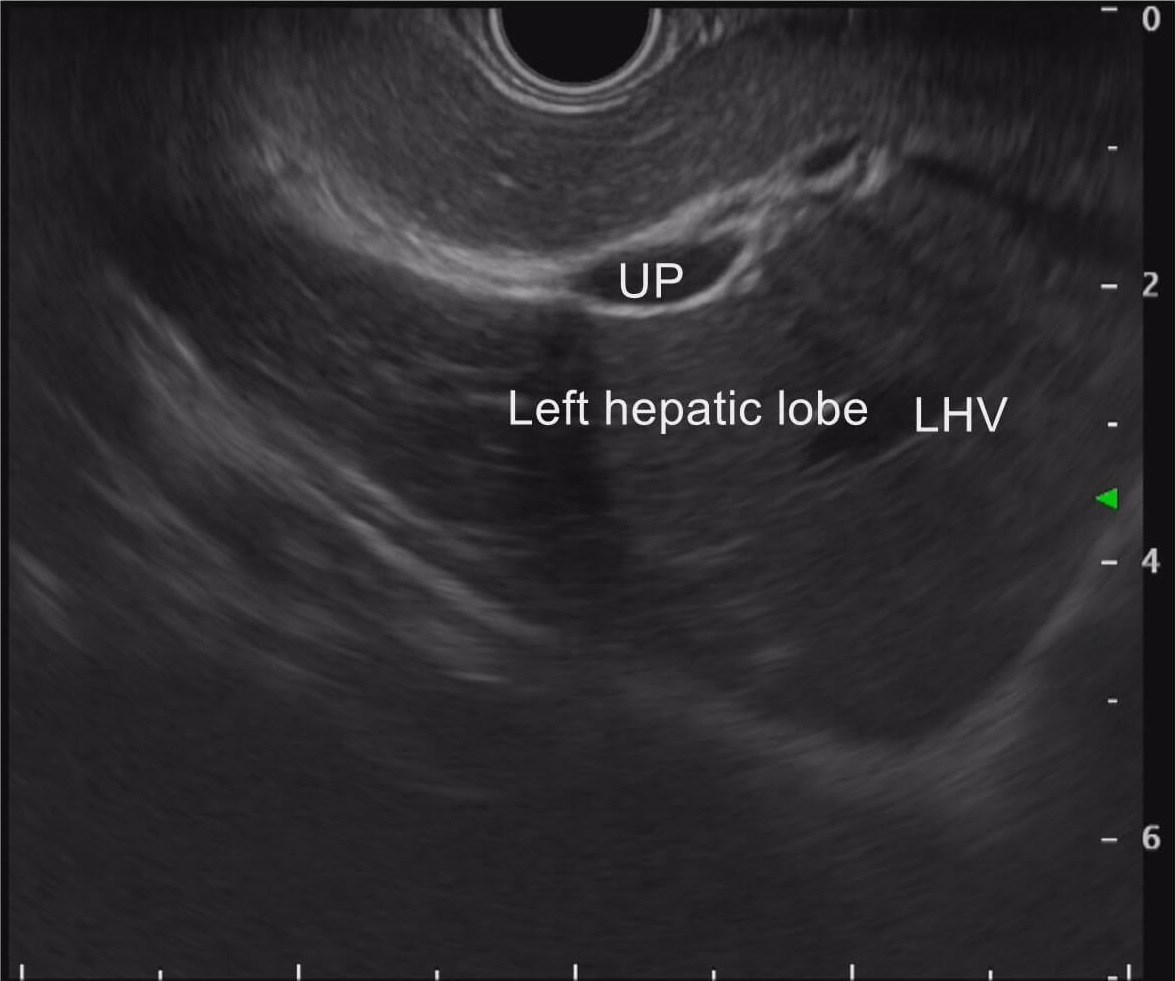
1 Left hepatic lobe/left hepatic vein
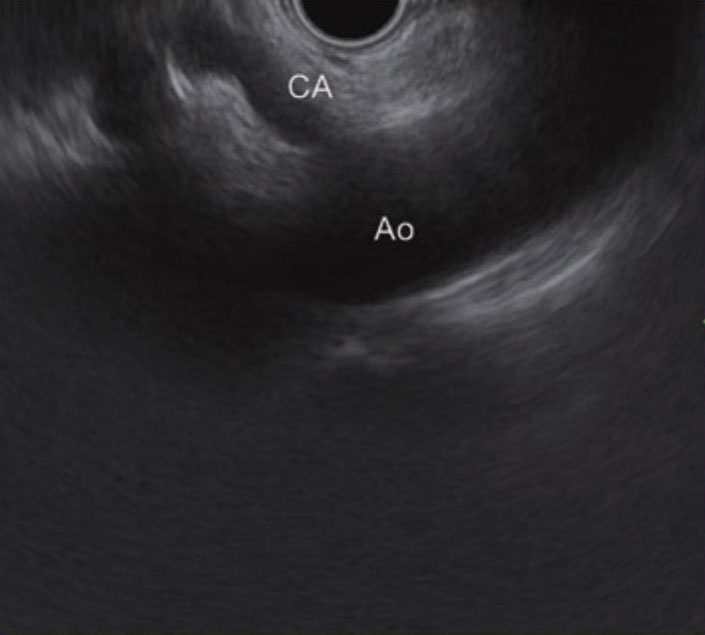
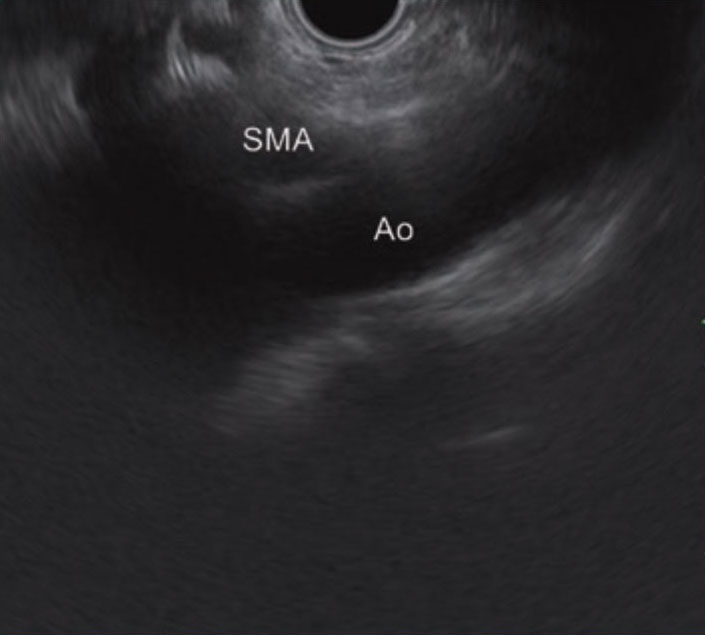
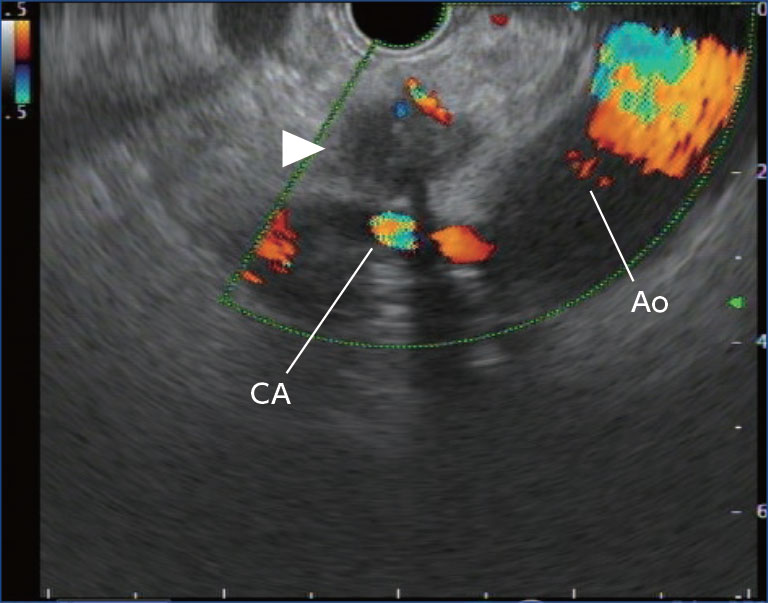
2 Aorta/celiac artery; aorta/superior mesenteric artery
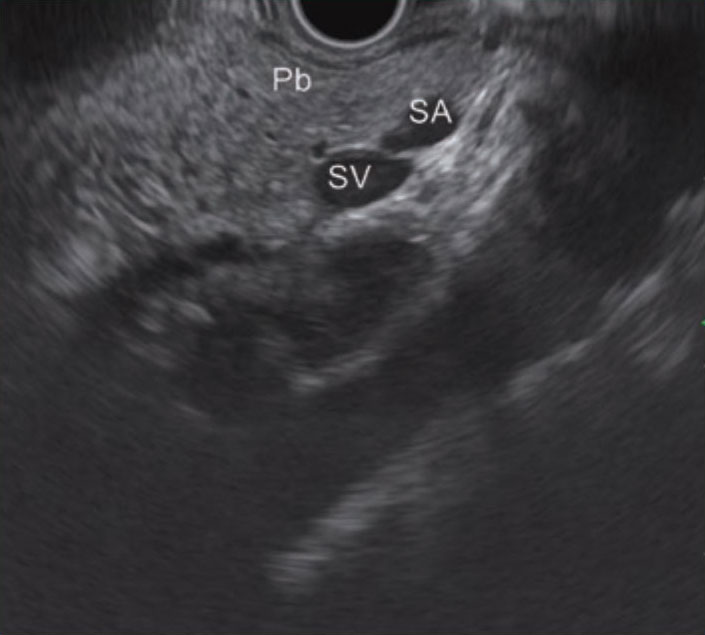
3 Splenic artery/splenic vein/body of the pancreas
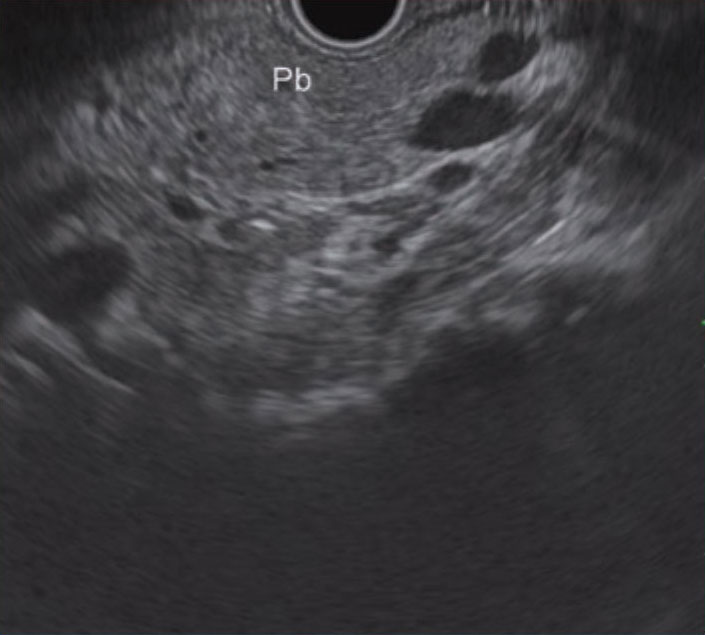
4 Body of the pancreas
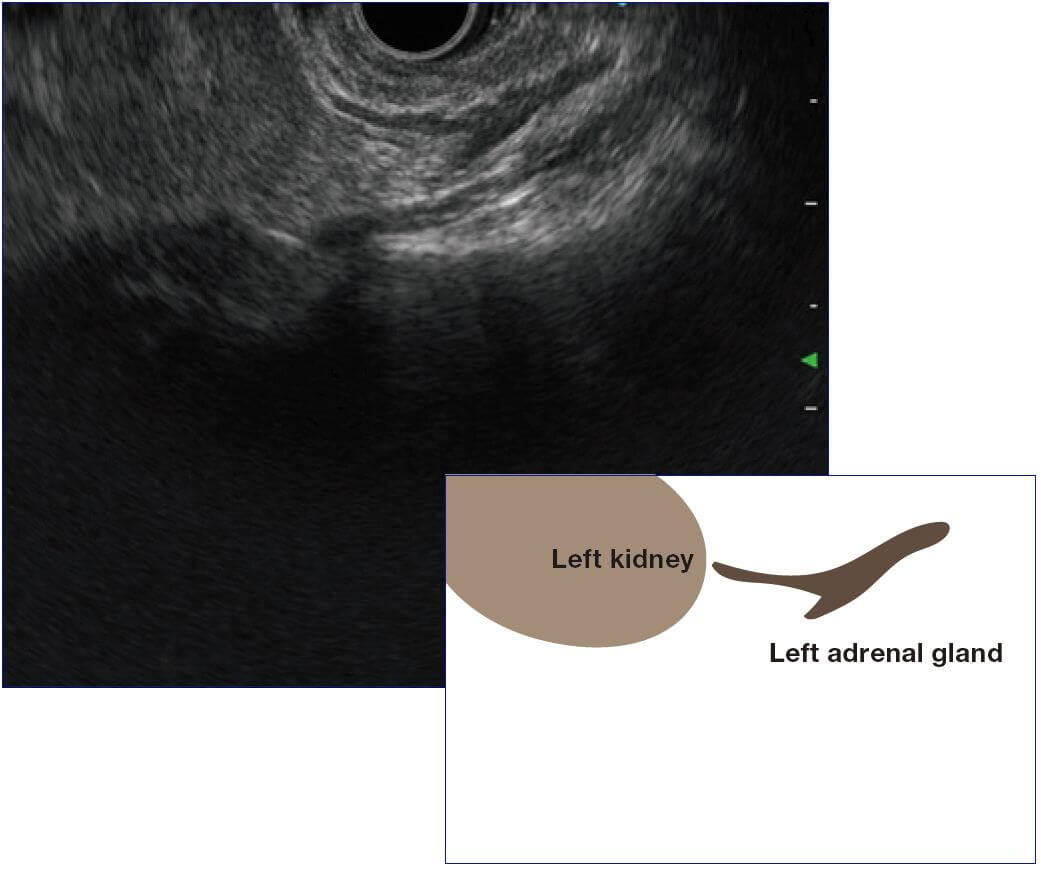
5 Tail of the pancreas/left kidney
6 Splenic hilum
7 Body of the pancreas
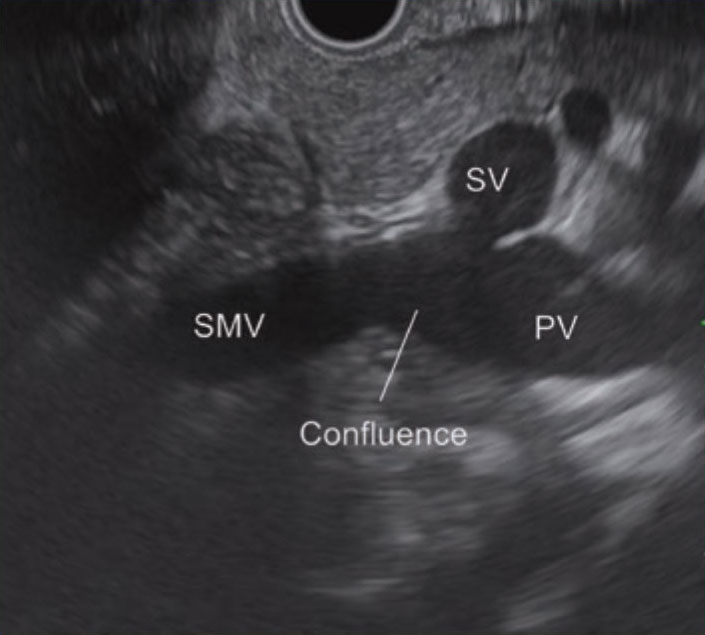
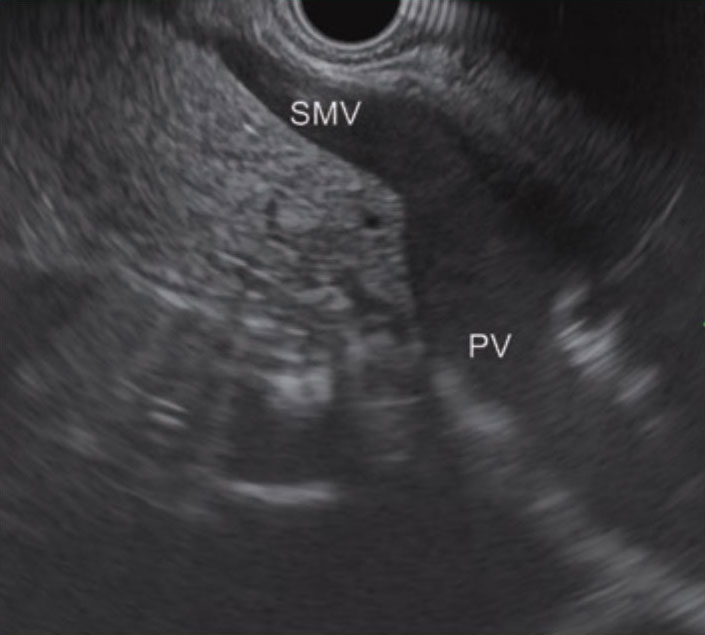
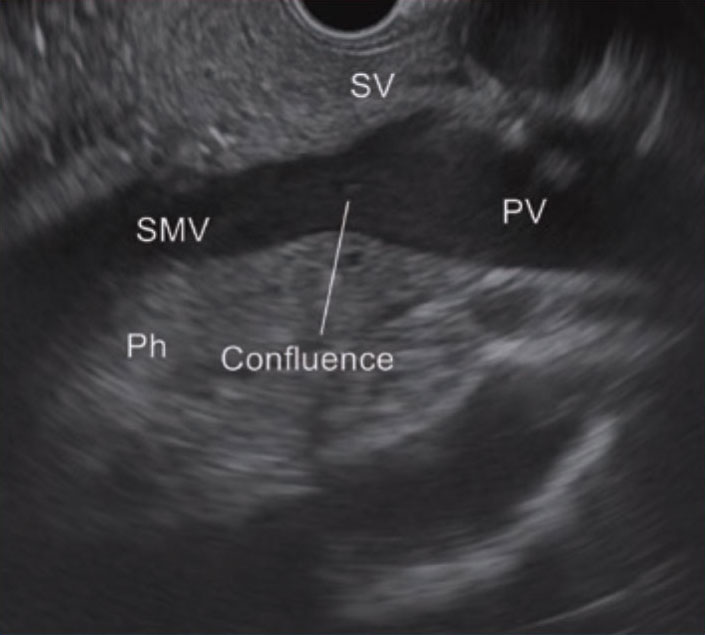
8 Portal confluence
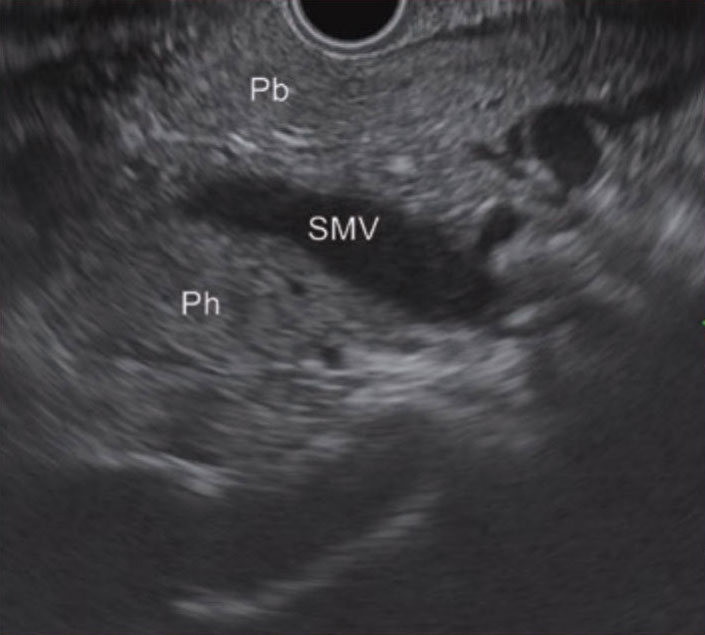
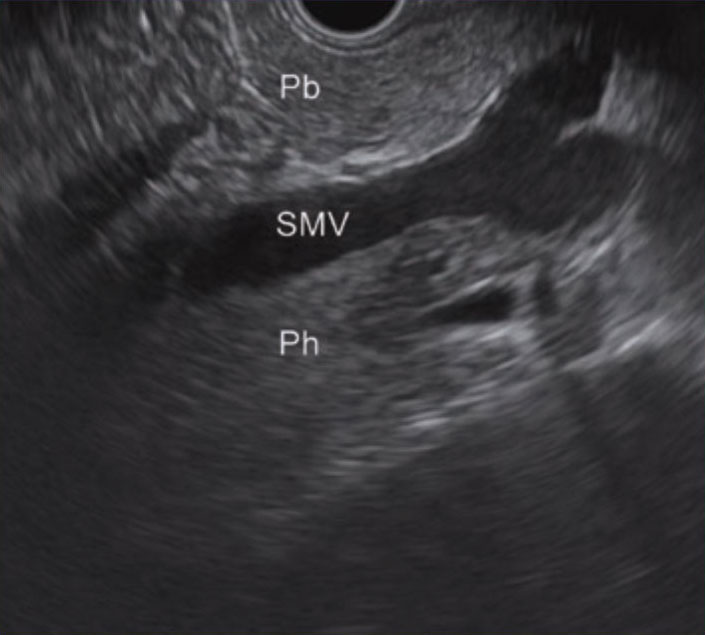
9 Superior mesenteric vein/head of the pancreas
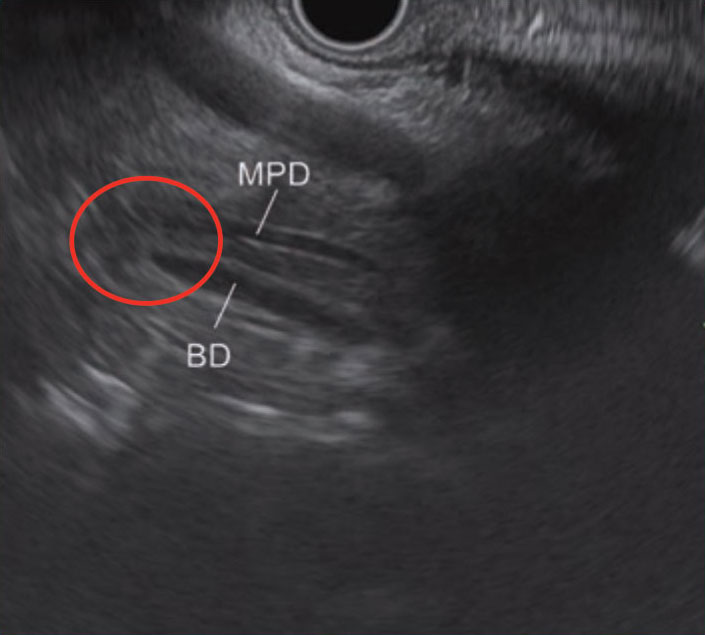
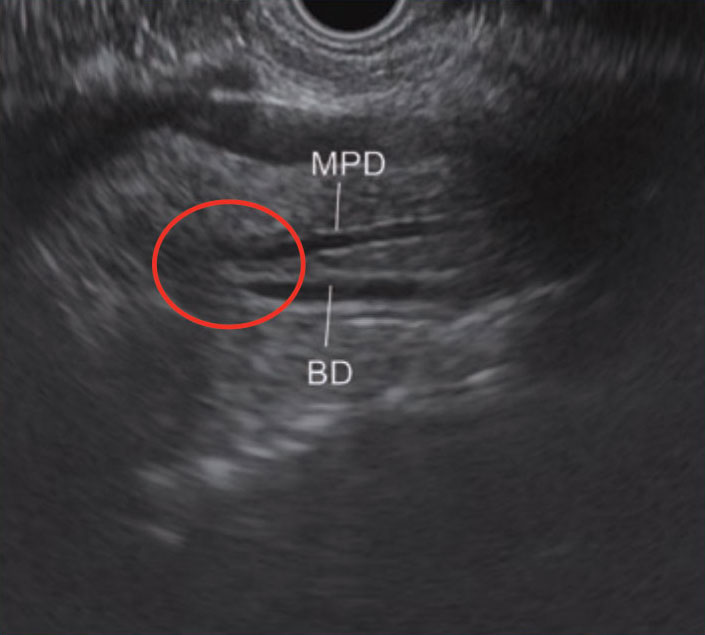
10 Head of the pancreas (area of the major papilla)
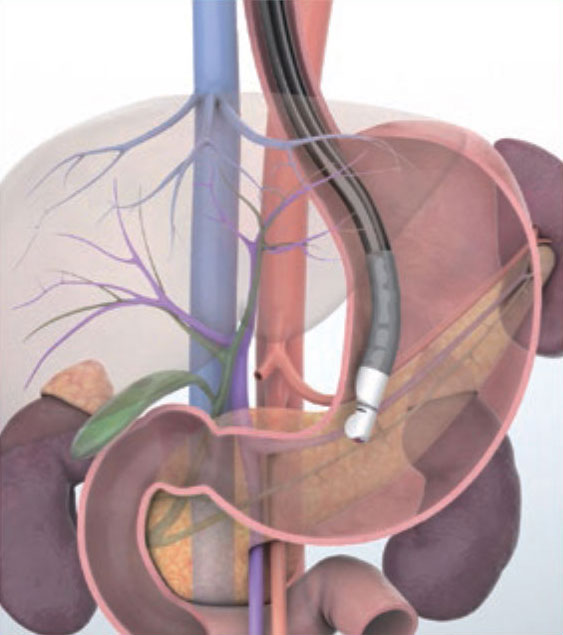
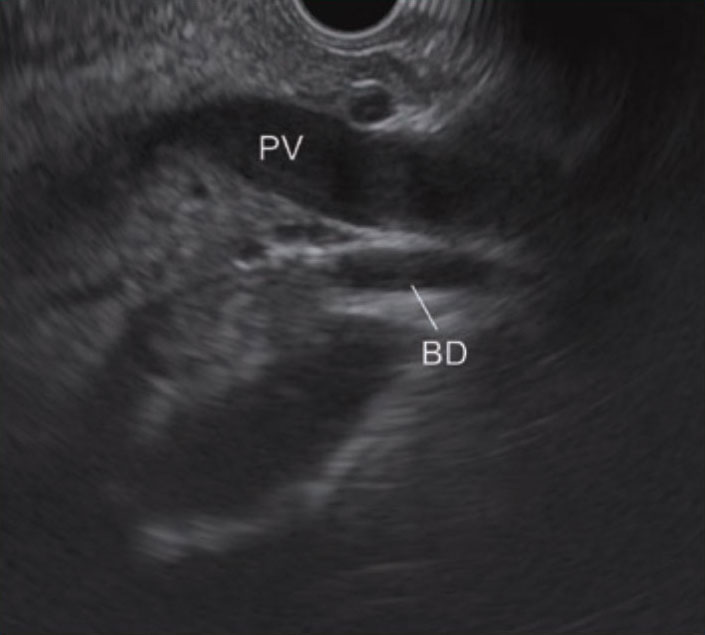
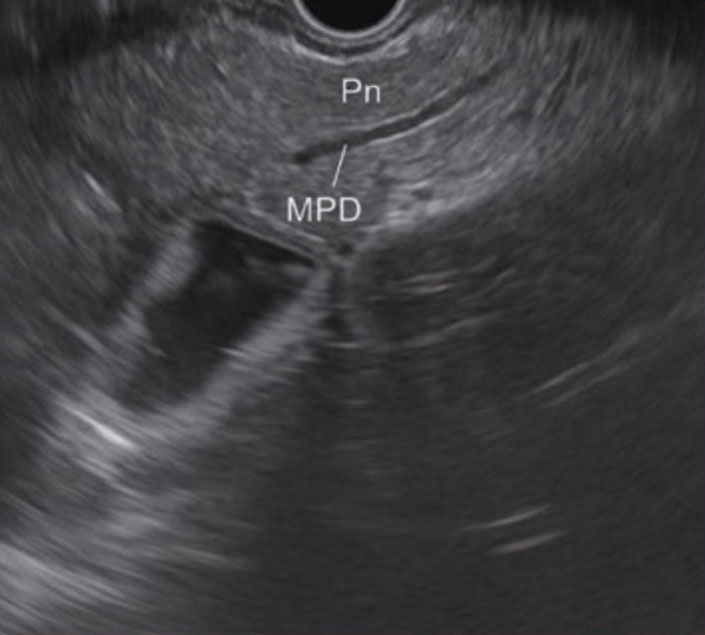
11 Superior mesenteric vein/portal vein
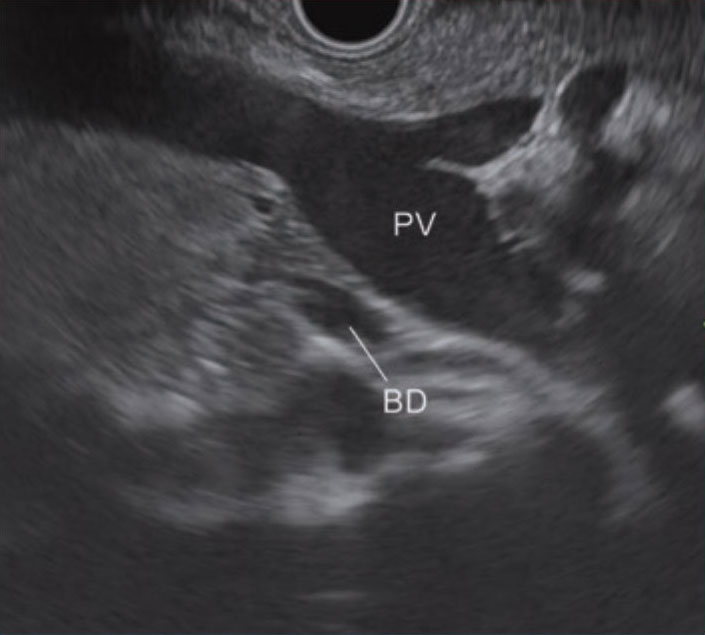
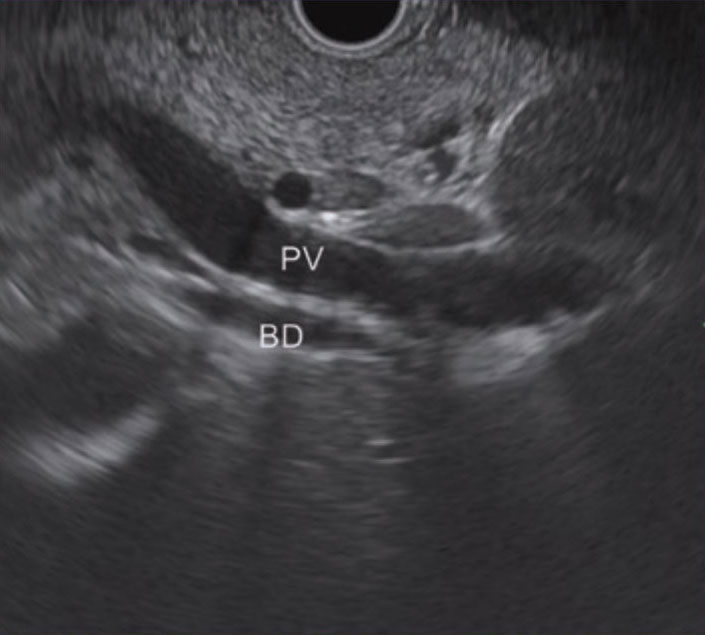
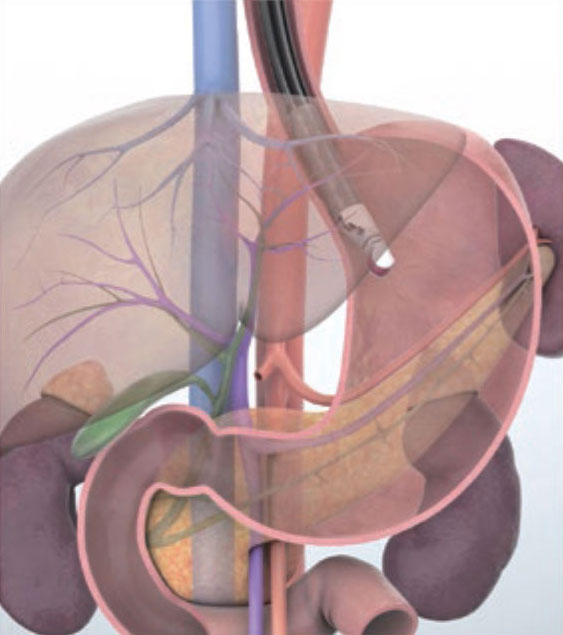
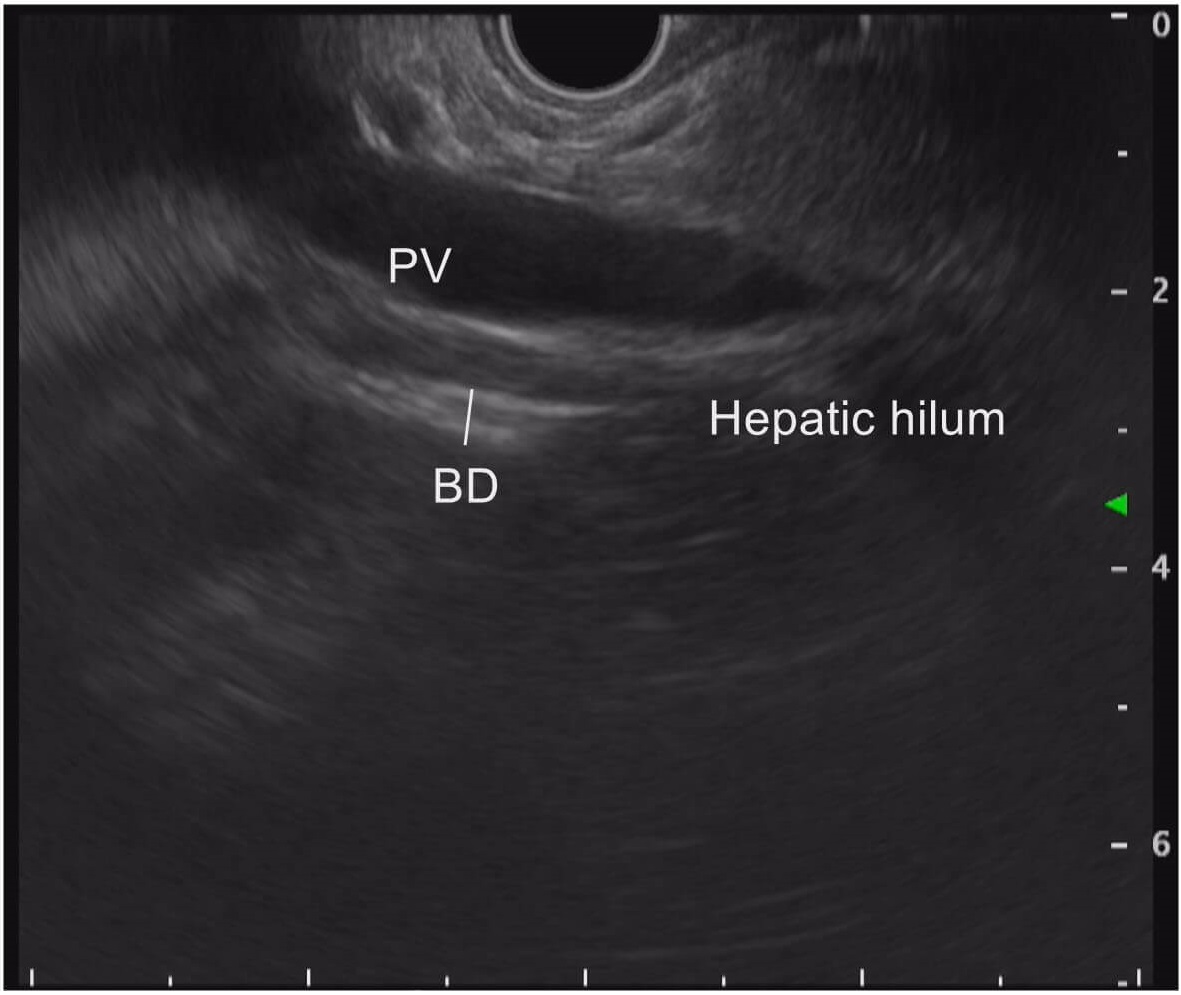
12 Portal vein/bile duct
13 Hepatic hilum (portal vein/bile duct)
Aortic route video
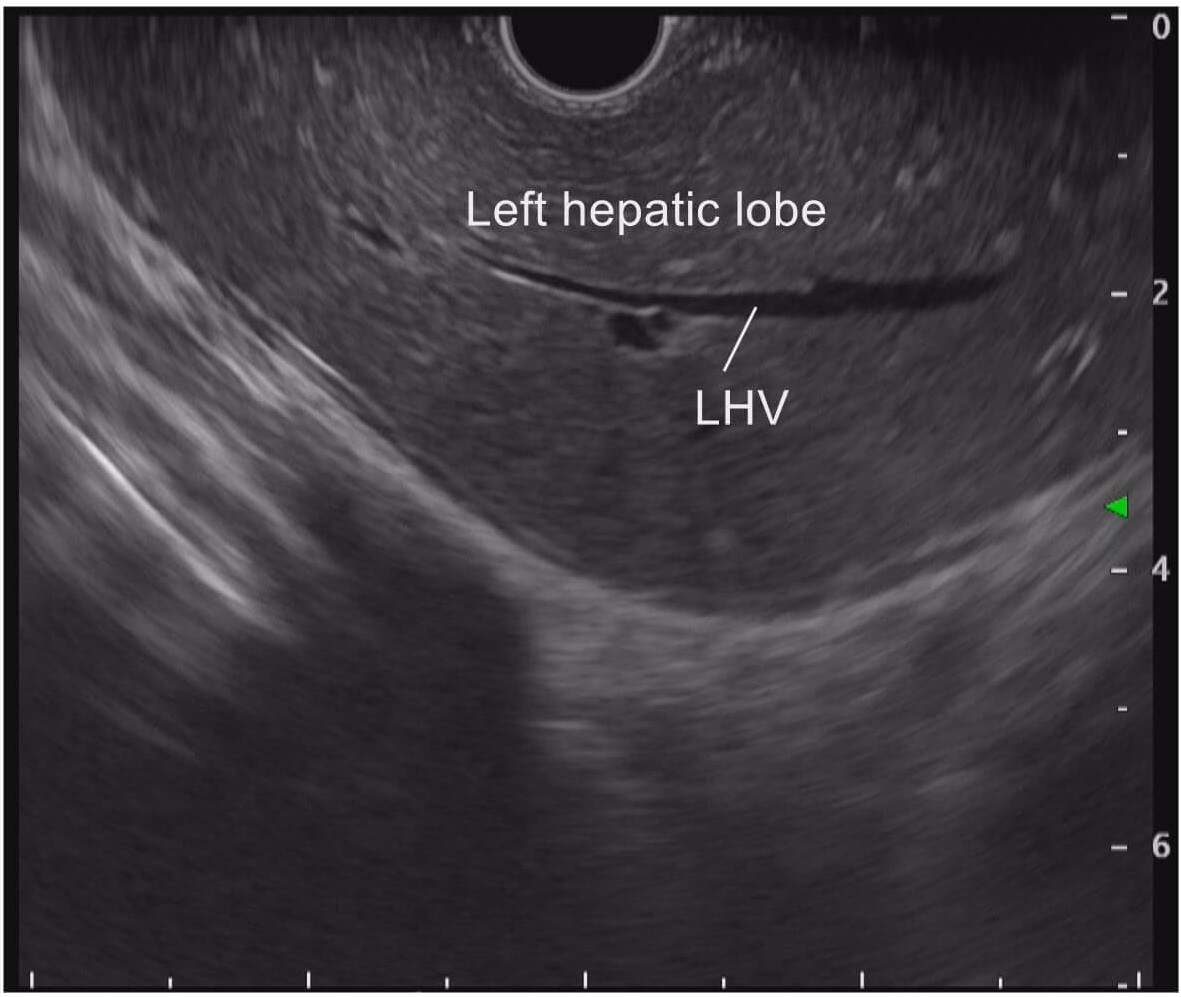
STEP 1 Left hepatic lobe/left hepatic vein
When the scope is inserted with the patient lying in the left lateral position, the lateral segment of the left lobe is imaged as the scope passes the diaphragm. At this time, the transducer will be pointing to the anterior side. The left hepatic vein and umbilical portion of PV are imaged in this region.

STEP 2-1 Aorta/celiac artery
When the scope is turned clockwise, the abdominal aorta is imaged. As the scope is advanced to the inferior side along the abdominal aorta in this position, the celiac artery and superior mesenteric artery are imaged. In some cases, the celiac artery and superior mesenteric artery may not be imaged on the same screen.

STEP 2-2 Aorta/superior mesenteric artery
If the celiac artery and superior mesenteric artery are not imaged on the same screen, turn the scope clockwise or counterclockwise to identify the superior mesenteric artery (assuming that the celiac artery has been imaged). Sometimes, the superior mesenteric artery will be imaged first.
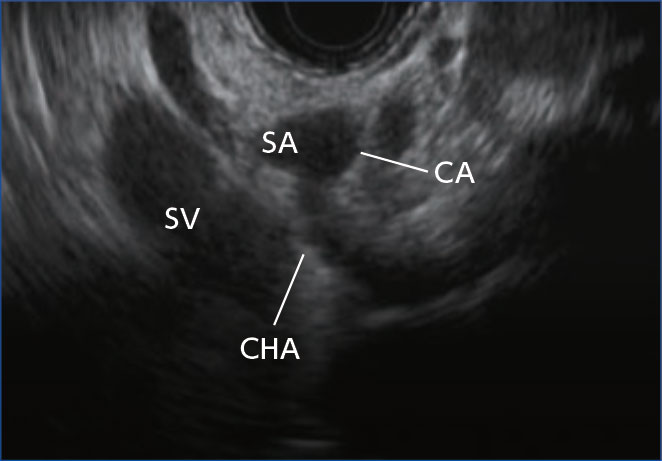
STEP 3 Splenic artery/splenic vein/body of the pancreas
While viewing the celiac artery, advance the scope a little and turn it clockwise. You will be able to observe the splenic artery and vein. In this position, the splenic artery is usually imaged on the proximal side of the transducer and the splenic vein is imaged on the distal side. Color Doppler and pulsed Doppler can help identify the splenic artery and vein (see “Tip 1”).

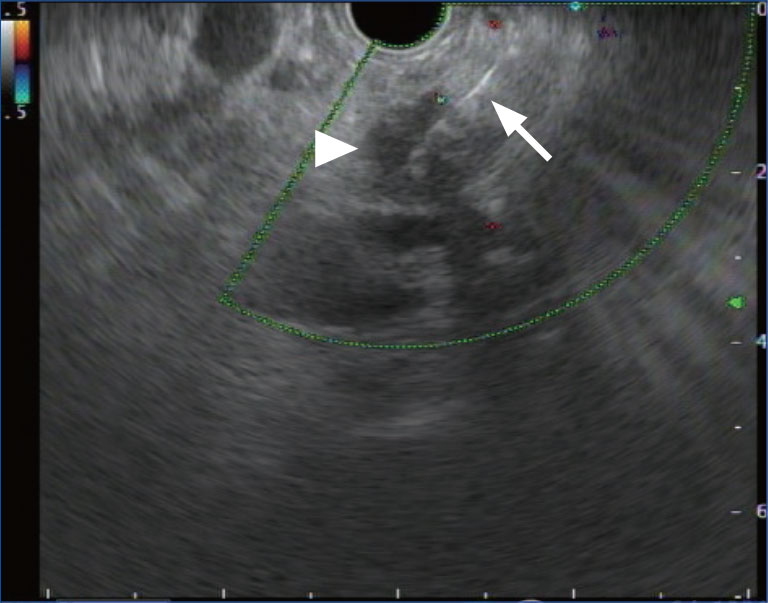
STEP 4 Body of the pancreas
Keep turning the scope clockwise, while pulling it gently to observe the body of the pancreas

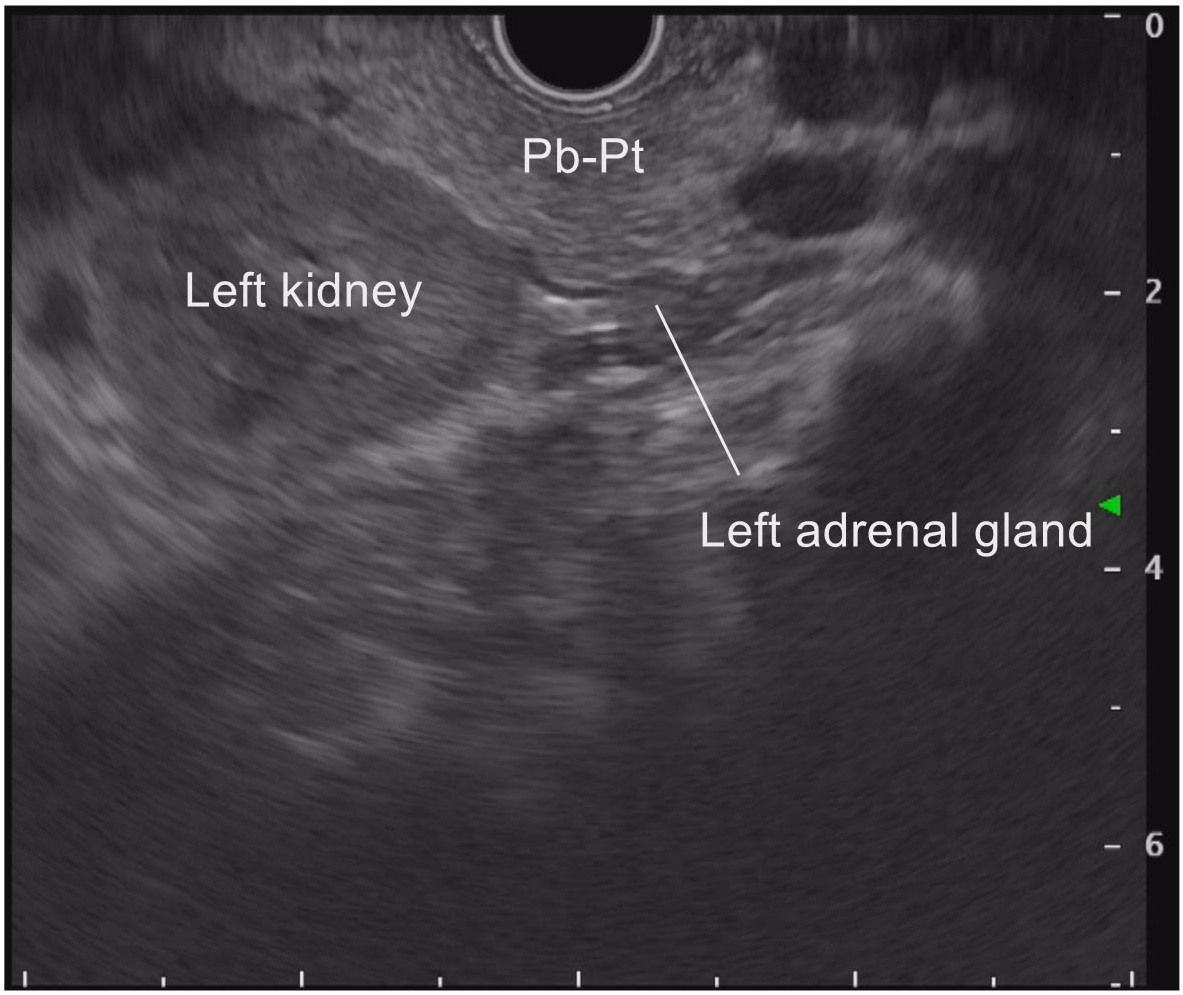
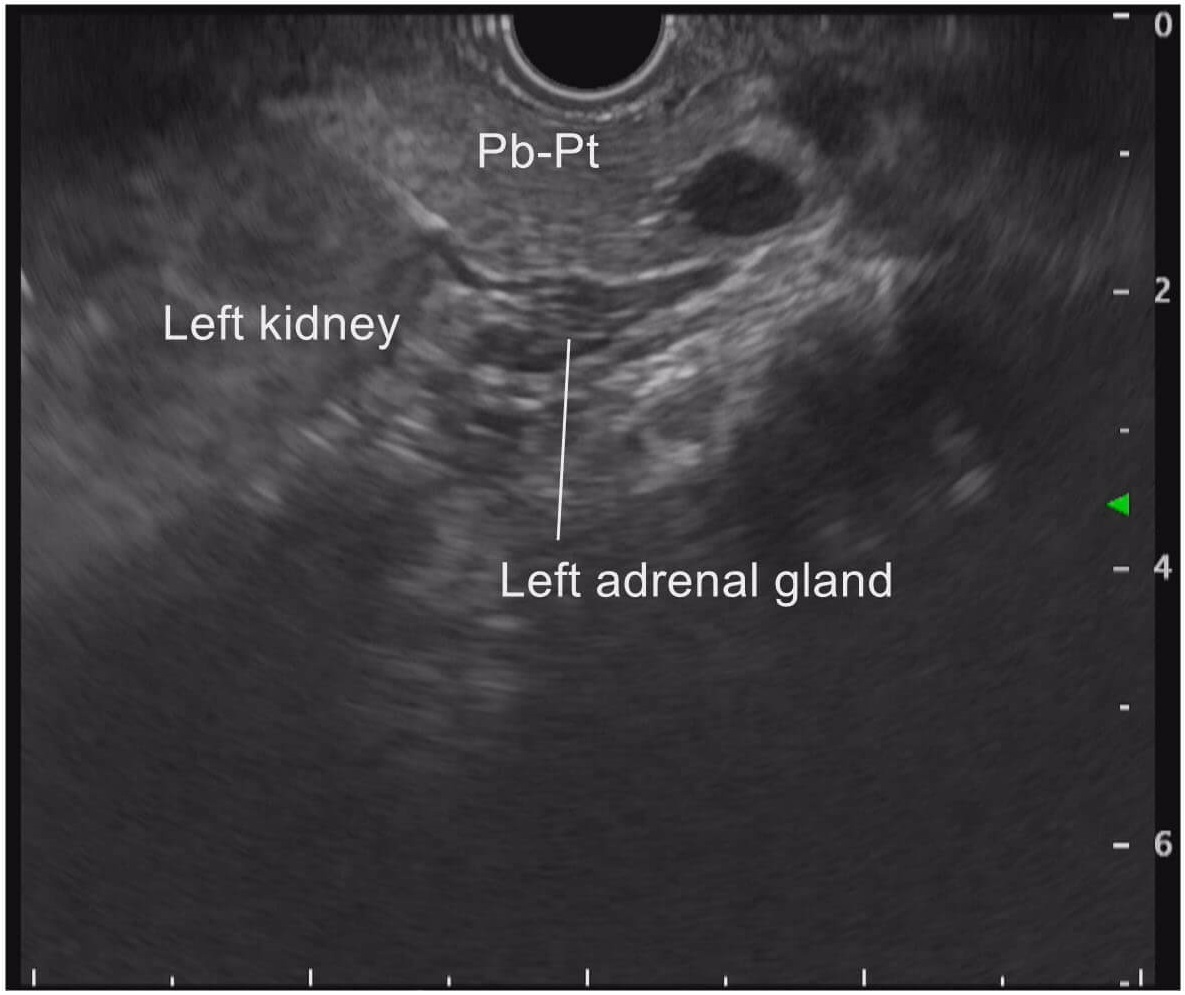
STEP 5 Tail of the pancreas/left kidney
While still turning the scope clockwise, observe as far as the tail of the pancreas. At this time, the left kidney is imaged on the distal side of the transducer. Sometimes the left adrenal gland can also be seen in this region (see “Tip 4”).

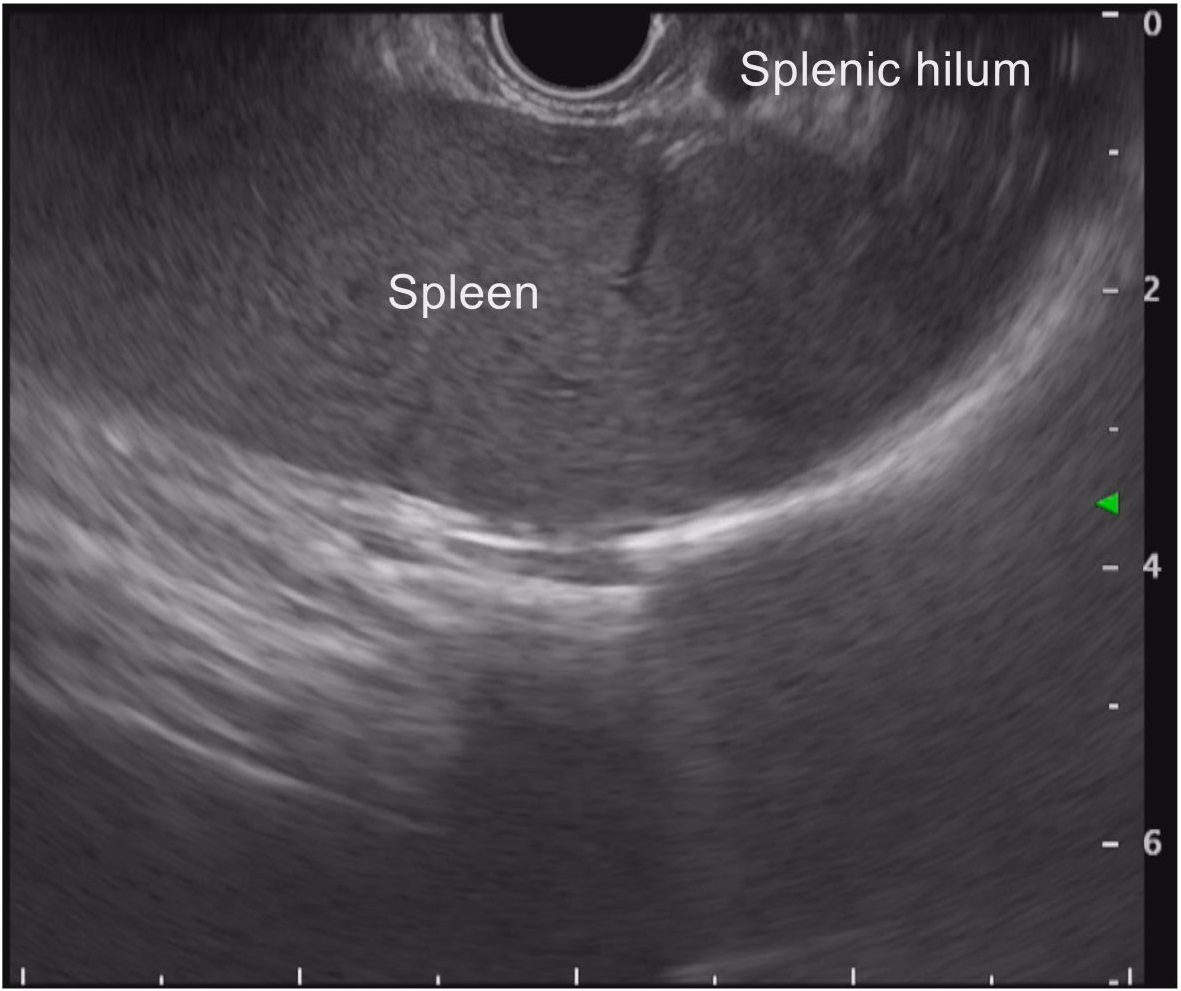
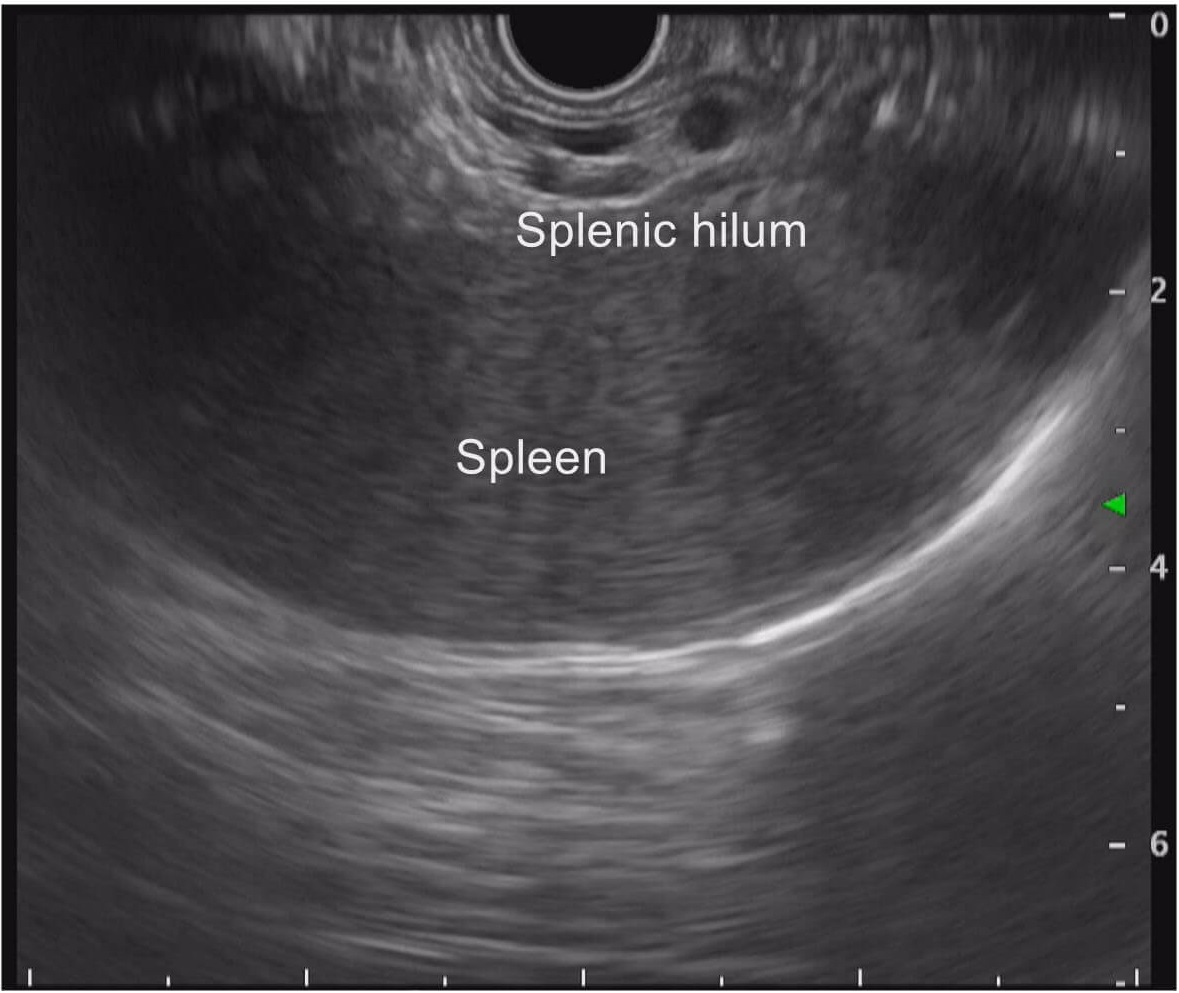
STEP 6 Splenic hilum
Continue turning the scope clockwise to follow the pancreas as far as the splenic hilum to observe the distal tail of the pancreas. At this time, upward angulation would make it easier to image the tail of the pancreas and splenic hilum.

STEP 7 Body of the pancreas
After the splenic hilum has been confirmed, observe continuously from the tail of the pancreas to the head of the pancreas. While doing this, advance the scope, slowly turning it counterclockwise a little at a time to observe the region from the tail of the pancreas to the body of the pancreas. Use the splenic vein as a reference point.
STEP 8 Portal confluence
As you follow the splenic vein while turning the scope counterclockwise, the junction (confluence) where the superior mesenteric vein and the splenic vein merge into the portal vein is imaged. In this position, carefully observe from the vicinity of the neck of the pancreas to the head of the pancreas. When following the splenic vein towards the confluence, you will find visualization easier if you advance the scope while bending the scope tip slightly up.
STEP 9 Superior mesenteric vein/head of the pancreas
After imagining the confluence, continue along the main pancreatic duct in the body of the pancreas to observe the area around the neck of the pancreas, turning the scope counterclockwise as you go. Use the superior mesenteric vein as a reference.

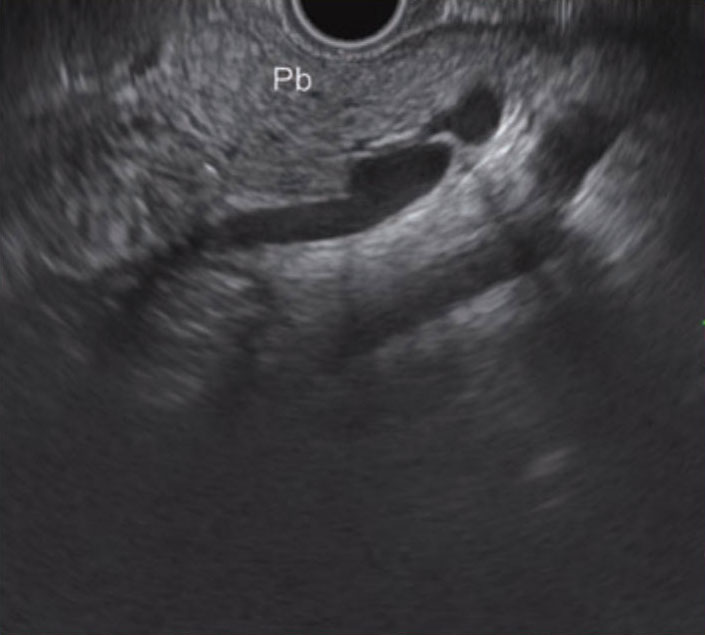
STEP 10 Head of the pancreas (area of the major papilla)
Advancing the scope, while continuously imaging the main pancreatic duct, will bring into view the bile duct and the main pancreatic duct in the area of the major papilla (circled section). Follow the bile duct and the main pancreatic duct right up to the major papilla. Observe this region carefully.

STEP 11 Superior mesenteric vein/portal vein
Maneuver the scope so that the superior mesenteric vein is imaged in the long axis direction and gradually withdraw the scope. You will notice that what is visualized changes from the confluence to the main portal vein

STEP 12 Portal vein/bile duct
Withdrawing the scope a little more brings the main portal vein and the confluence into view in the long axis direction. On the distal side, part of the bile duct can also be recognized.
STEP 13 Hepatic hilum (portal vein/bile duct)
As you follow the portal vein on the hepatic side while continuing to withdraw the scope, the extrahepatic bile duct that runs parallel to the portal vein is imaged. This makes it possible to identify the hepatic hilum.

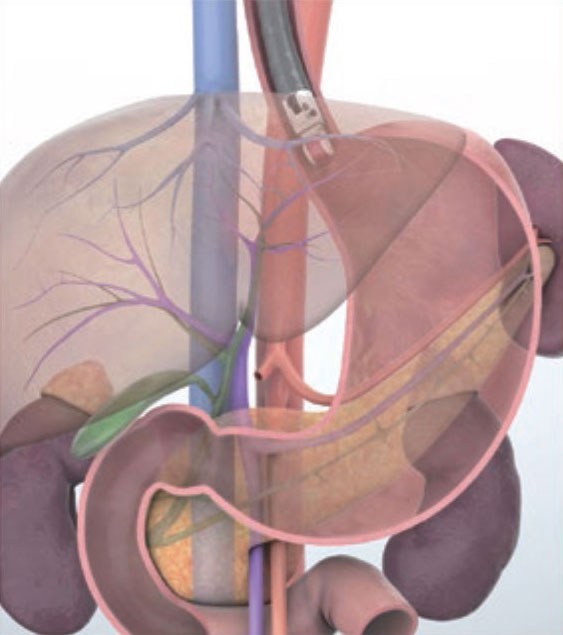
Imaging Techniques Transgastric approach (Portal vein route)
IMAGING STEP
1 Left hepatic lobe/left hepatic vein
2 Umbilical portion
3 Hepatic hilum (portal vein/bile duct)
4 Portal vein/bile duct
5 Portal confluence
6 Superior mesenteric vein/head of the pancreas
7 Head of the pancreas (area of the major papilla)
8 Neck of the pancreas
9 Body of the pancreas
10 Tail of the pancreas/left kidney
11 Splenic hilum
Portal vein route video
STEP 1 Left hepatic lobe/left hepatic vein
When the scope is inserted with the patient in the left lateral position, the lateral segment of the left hepatic lobe is imaged as the scope passes the diaphragm. At this time, the transducer is pointing to the anterior side. The left hepatic vein can be seen in this region.
STEP 2 Umbilical portion
When you turn the scope clockwise, it will image the umbilical portion of portal vein.

STEP 3 Hepatic hilum (portal vein/bile duct)
Slowly advance the scope while continuing to turn it clockwise. Visualize the region from the umbilical portion to the portal vein and observe the area around the hepatic hilum.
STEP 4 Portal vein/bile duct
Advance the scope while viewing the region from the hepatic hilum to the portal vein. Observe the extrahepatic bile duct that runs parallel on the distal side of the transducer.
STEP 5 Portal confluence
When you advance the scope to follow the portal vein towards the opposite side of the liver, the confluence will be visualized.

STEP 6 Superior mesenteric vein/head of the pancreas
Using the superior mesenteric vein as a reference, turn the scope counterclockwise while slowly advancing it to observe the area from the neck of the pancreas to the head of the pancreas.

STEP 7 Head of the pancreas (including the area of the major papilla)
While advancing the scope and continuously imaging the area from the neck of the pancreas to the main pancreatic duct, visualize the bile duct and the main pancreatic duct in the area of the major papilla (circled section). Observe the area around the major papilla, while continuing to follow the bile duct and main pancreatic duct as closely as possible.

STEP 8 Neck of the pancreas
After observing the area around the major papilla, visualize the main pancreatic duct continuously as you slowly withdraw the scope to observe the neck of the pancreas.

STEP 9 Body of the pancreas
As you turn the scope clockwise at the neck of the pancreas, you will be able to observe the body of the pancreas. Usually in this position, the splenic artery is imaged on the proximal side of the transducer and the splenic vein is imaged on the distal side. Color Doppler and pulsed Doppler can help make it easier to identify the splenic artery and vein.


STEP 10 Tail of the pancreas/left kidney
While turning the scope clockwise, observe as far as the tail of the pancreas. Typically, the left kidney is imaged on the distal side of the transducer at this time. Sometimes, the left adrenal gland may also be seen in this area.
STEP 11 Splenic hilum
Turn the scope further in the clockwise direction to follow the pancreas as far as the splenic hilum to observe the distal tail of the pancreas. Angulating the scope slightly upward makes it easier to image the tail of the pancreas and splenic hilum.
Imaging major arteries in the abdominal cavity using convex EUS (See Step 3 in “Transgastric approach — Aortic route”.)
The trick to achieving good quality imaging of vessels when performing convex EUS is to use color Doppler and move the scope very slowly (pushing/pulling and axial rotation). This ensures that you are able to identify the vessels without missing them.
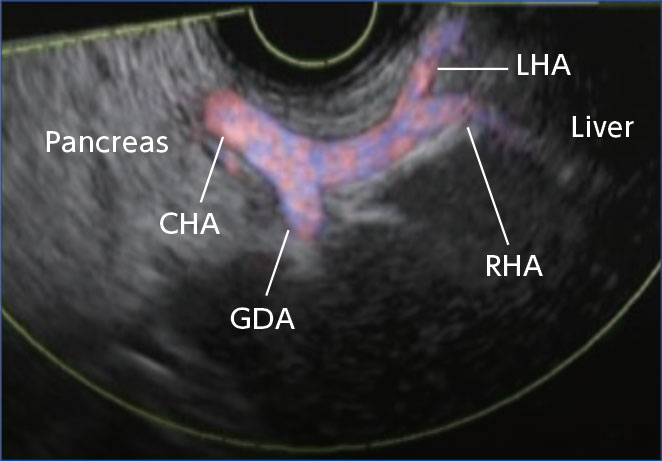
To image major arteries from the stomach and duodenum, start by imaging the celiac artery, which branches from the aorta, as well as the superior mesenteric artery. Identify the vessels while following the celiac aorta. The first branch from the celiac aorta is usually the left gastric artery. Follow the celiac aorta while rotating the scope clockwise and you should be able to observe the splenic artery (Fig. a). As you continue to follow the celiac aorta while rotating the scope counterclockwise, the common hepatic artery will come into view, followed by the proper hepatic artery and the gastroduodenal artery. After that, you can image the region beyond the bifurcation of the proper hepatic artery as far as the left and right hepatic arteries (Fig. b).
When observing from the duodenal bulb, first image the common hepatic artery. Then by turning the scope clockwise, you can image the gastroduodenal artery which runs across the head of the pancreas. From there, identify the proper hepatic artery by rotating the scope counterclockwise and follow it as far as the hepatic hilum. This allows you to observe this area in detail (Fig. c). From the descending part of the duodenum, image the superior mesenteric artery. By following the superior mesenteric artery, you can check various branches such as the first jejunal branch.
Although some of the arteries described above can be observed with convex EUS alone, we recommend that you use CT in combination with EUS. This enables you to make comparisons, facilitating more accurate recognition and identification.

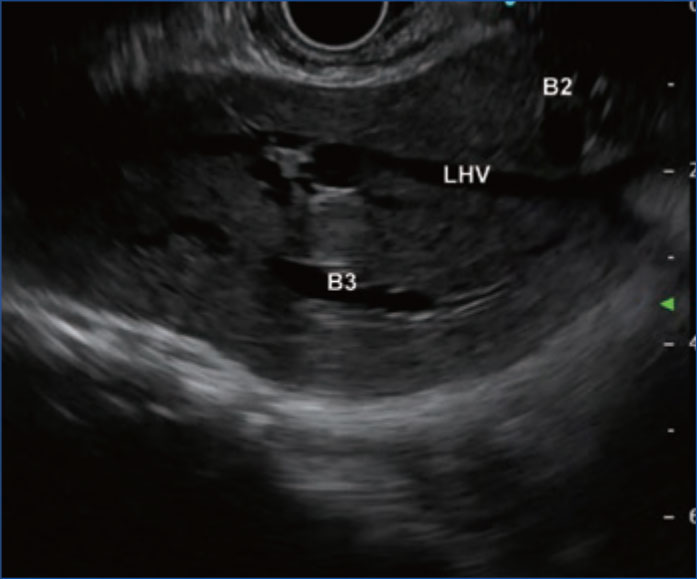
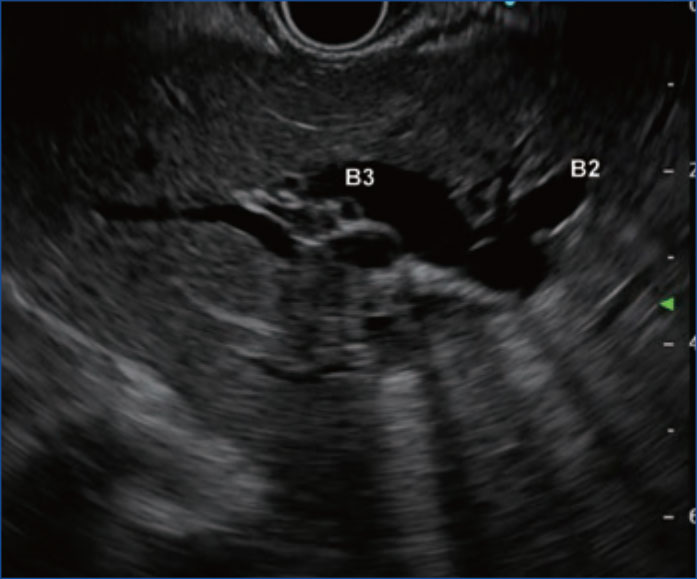
Imaging the lateral branches (B2/B3) of the left intrahepatic bile ducts to perform EUS-guided hepaticogastrostomy (EUS-HGS)
When performing EUS-HGS where the transgastric approach is taken, it is of vital importance that the lateral branches (B2/B3) of the left intrahepatic bile ducts be imaged accurately. Two imaging techniques are described below.
1) When the left hepatic vein is scanned in the long axis direction, segment 2 (S2) is imaged on the proximal side of the LHV and segment 3 (S3) on the distal side, i.e., these bile ducts are B2 and B3 respectively (Fig. a).
2) When imaging from the umbilical portion, B2 is imaged in the upper right part of the screen and B3 on the left side (Fig. b). When performing EUS-HGS, we recommend you puncture B3 rather than B2, as puncturing B2 would likely result in a transesophageal puncture. Imaging B3 from the left hepatic vein may result in a transesophageal puncture since the scope tip enters the area around the EG junction. In other words, caution is required (fluoroscopic confirmation would be a good idea). On the other hand, puncturing B3 imaged from the umbilical portion can often result in a transgastric puncture.
*Olympus EUS needles are only FDA approved for EUS-FNA or EUS–FNB. The use of a guidewire through Olympus EUS needles is contraindicated.
Why you need to observe the para-aorta in the portal vein route via a transgastric approach
The portal vein route via the transgastric approach is a technique for imaging the pancreas and bile duct while using the portal vein as a reference. Although not mentioned in the descriptions of the portal vein route in this handbook, it is important to closely observe the aorta and surrounding area, as well as the celiac artery and the beginning of the superior mesenteric artery, in order to confirm the presence or absence of para-aortic lymph node swelling (Figs. a & b).
Imaging the adrenal gland (See Step 5 in “Transgastric approach — Aortic route”.)
To image the left adrenal gland, first visualize the left kidney via the transgastric approach and carefully observe the region between its upper pole (upper right direction on the ultrasound screen) and the aorta while turning the scope clockwise or counterclockwise. The left adrenal gland generates a low echo whose shape resembles a flying seagull or lower-case omega (ω) in the Greek alphabet (Fig. a).
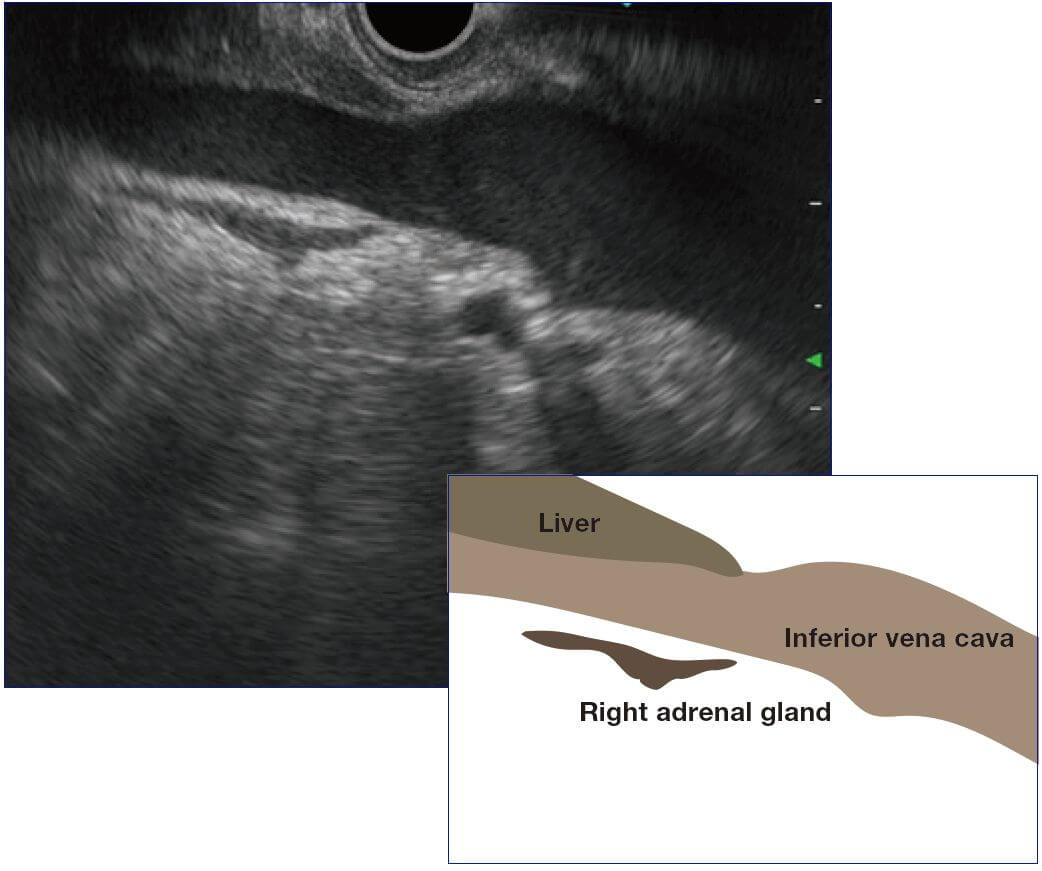
If you can’t obtain a clear image, bend the scope tip upward and approach the target site. This will help you get clearer images. To image the right adrenal gland, first visualize the longitudinal image of the portal vein at the duodenal bulb, and then image the inferior vena cava while turning the scope clockwise a little to scan the surrounding area (mainly posterior side) from the inferior surface of the liver (Fig. b). However, you will need to be careful because moving the scope too much in this region poses a risk of duodenal perforation.
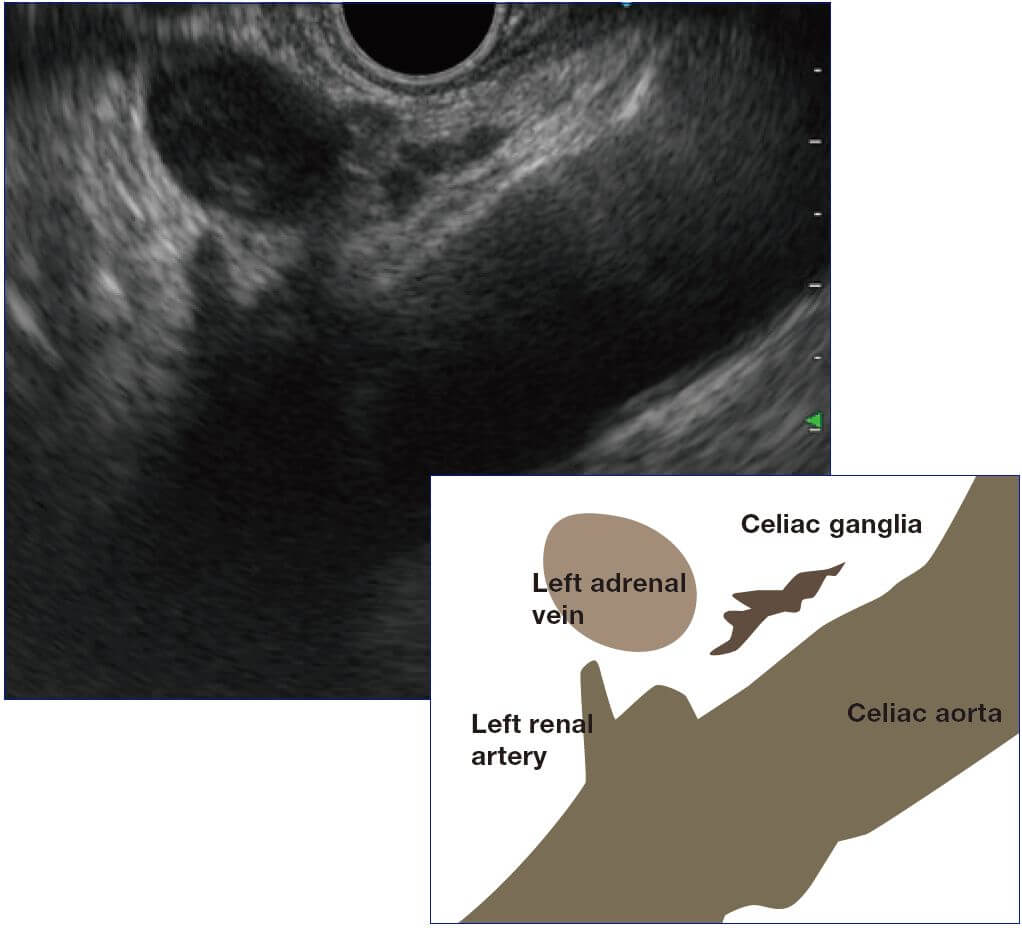
Imaging the celiac ganglia
EUS-guided celiac plexus block/neurolysis is known for its efficacy in cancer pain management. To image the celiac ganglia, first visualize the left adrenal gland (see “Tip 4: Imaging the adrenal gland”). From this position, visualize the celiac artery while turning the scope counterclockwise. Careful observation of the region between the left adrenal gland and the abdominal aorta makes it possible to visualize celiac ganglia (which exhibit a low echo) (Fig.).
Celiac ganglia can vary widely from irregular to flat and nodular, ranging in size from 5 mm to 2 cm in length. If you find one ganglion, you will normally find multiple ganglia around it. Careful observation reveals that they are connected in a beaded chain with a low filamentous echo. Since the celiac ganglia are fairly deep, angulate the scope quite sharply and approach the target site as closely as possible to image them clearly.